Google Classroom
Overview
Requirements
How to create a class
- Send a class code
- Send an invitation
How to import a Google class into PBS LearningMedia
How to assign a PBS LearningMedia resource to your Google class
How a student completes an assignment
How to view student results
Google Classroom add-on
Google Classroom is a free web service developed by Google for schools with the primary purpose of streamlining the process of sharing files between teachers and students in a paperless way.
PBS LearningMedia now fully integrates with Google Classroom, giving you the ability to sync class rosters, assignments, and assignment results between PBS LearningMedia and Google Classroom.
Requirements
- Teachers and students must each have a valid Google account.
- Teachers and students must each have a PBS LearningMedia account.
- Students must accept Google's permissions when signing in for a lesson.
- Students must sign in to the PBS LearningMedia website with their Google account before a teacher can send the student a PBS LearningMedia assignment and have it sync between the two platforms.
How to create a class in Google Classroom
To being using Google classroom, you must first import a Google classroom into PBS LearningMedia.
- From your Gmail account, click the grid in the upper right corner of the page, to the left of your sign-in (Figure 1.1).
- Scroll down the options presented, or click More, and click Classroom (Figure 1.2).
Figure 1
- Click the plus sign in the upper right side of the page and click Create class (Figure 2).
If you already have classes created, they appear on the page.
Figure 2

- Click the checkbox verifying you understand Google's requirements (Figure 3.1).
- Click Continue (Figure 3.2).
Figure 3

- In the Class name textbox, type the name of the class you are creating (Figure 4.1). Give it a name that indicates what type of class it is or the time of day you have the class. This field is required.
- You can fill out the other fields (Subject, Room) to provide more context.
- When finished, click Create (FIgure 4.2).
Figure 4

- The creation status displays "Creating..." (Figure 5).
Depending on your internet speed, creating the class could take up to a few seconds.
Figure 5

- If an alert appears, click Got It or the X in the upper right of the alert box to close the alert (Figure 6).
Figure 6

There are two ways you can invite students to your class:
Sending a class code
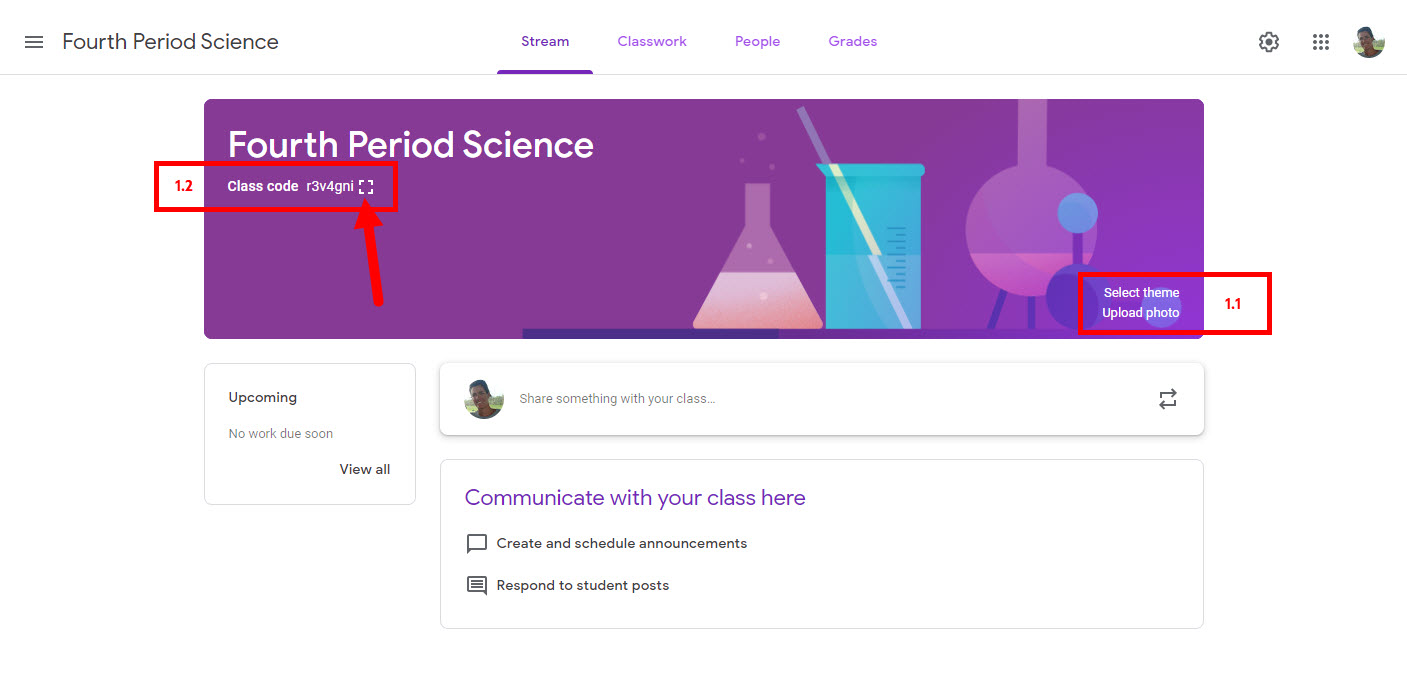
- Your class has been created and Google automatically assigns a background image and color scheme. These elements can be changed in the lower right section of the banner (Figure 1.1).
- Click the box to the right of the class code to view the class code (Figure 1.2).
Figure 1
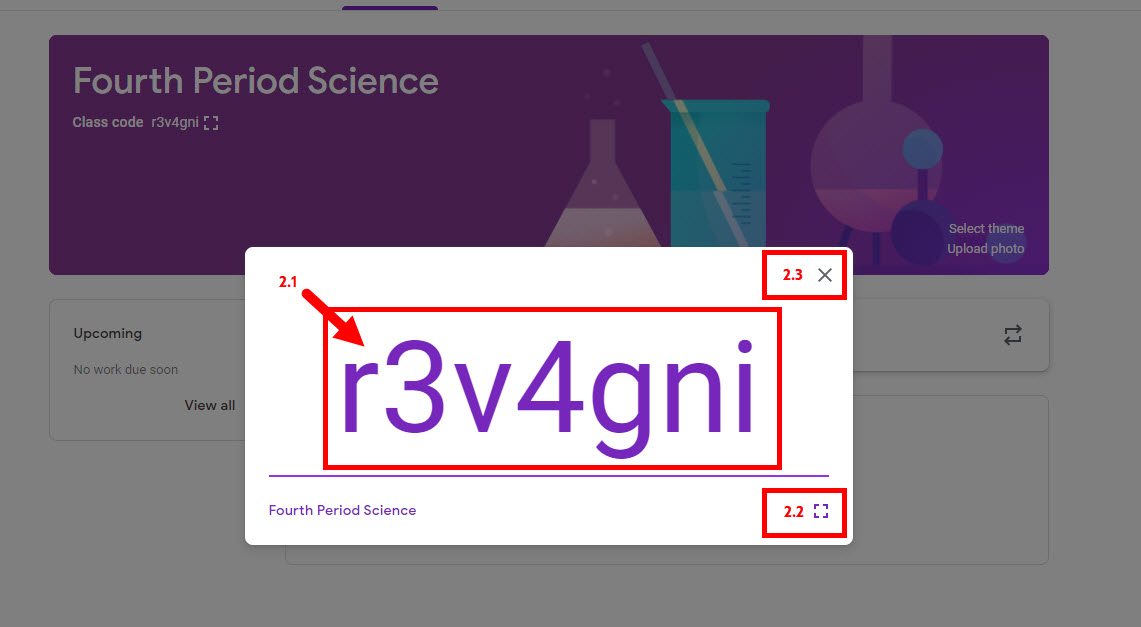
- The class code displays in a larger format (Figure 2.1). Copy and send this code to your students so they can join your class.
- Click the square box in the bottom right side to further enlarge the code (Figure 2.2).
- When finished, click the X in the upper right corner of the popup box to close this window (Figure 2.3).
Figure 2
Sending an invitation
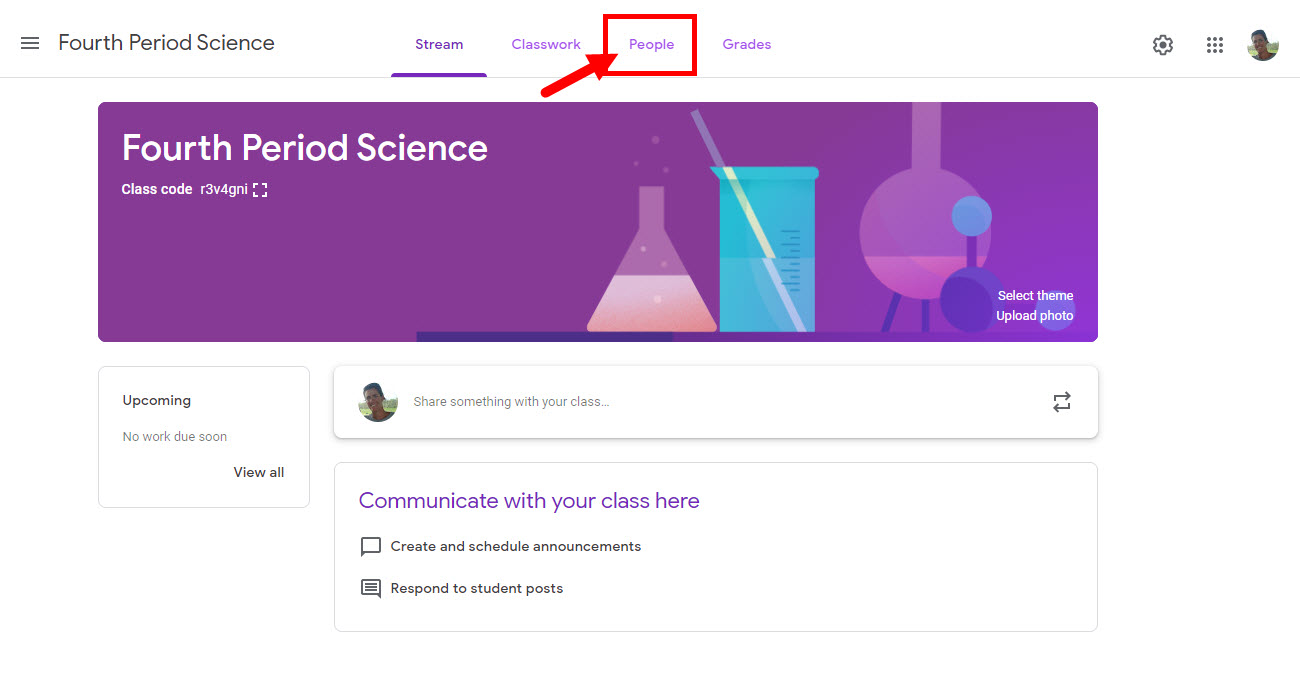
- Click People in the top navigation menu (Figure 1).
Figure 1
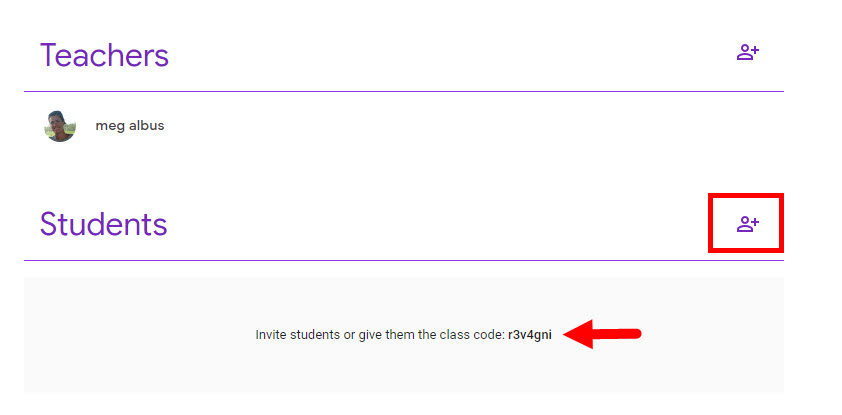
- In the Students section, click the person icon to begin inviting your students to your class (Figure 2).
You can also access the class code at the bottom of this page.
Figure 2
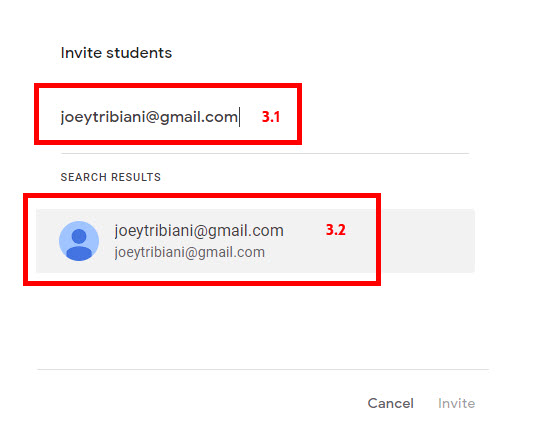
- Click where it displays, "Type a name or email" and type the email address of the student(s) to whom you want to send an invitation (Figure 3.1).
- You can separate email addresses by tapping your Tab key or by clicking Add recipient under Search Results (Figure 3.2).
Figure 3
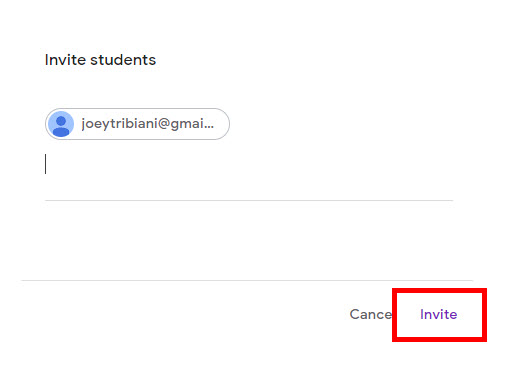
- When finished, click Invite (Figure 4).
Figure 4
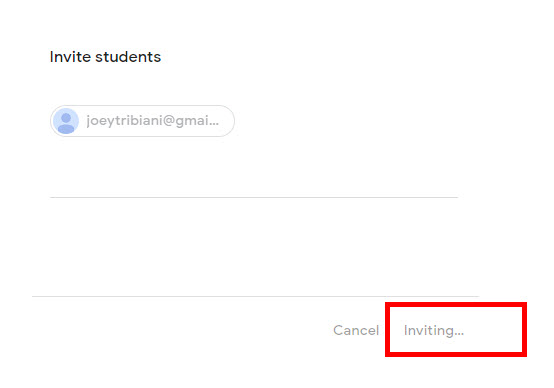
- Allow a few seconds for the process to complete. The status displays as "Inviting..." (Figure 5).
Figure 5
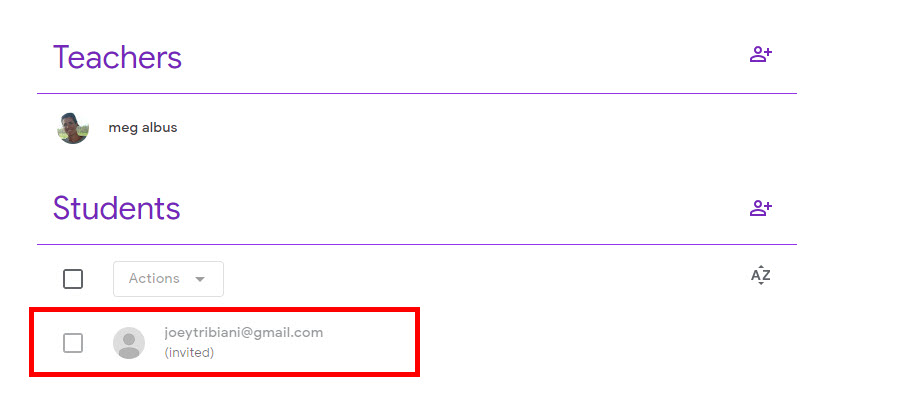
- The student email displays in the Students section with a status of Invited (Figure 6). When students have signed in to the class using the code or the link that was sent to them, they will show up under the Students section with a green Google Classroom icon next to their name.
Figure 6
How to import a Google class into PBS LearningMedia
- After you have created a class in Google Classroom and invited students, you can import the class into PBS LearningMedia.
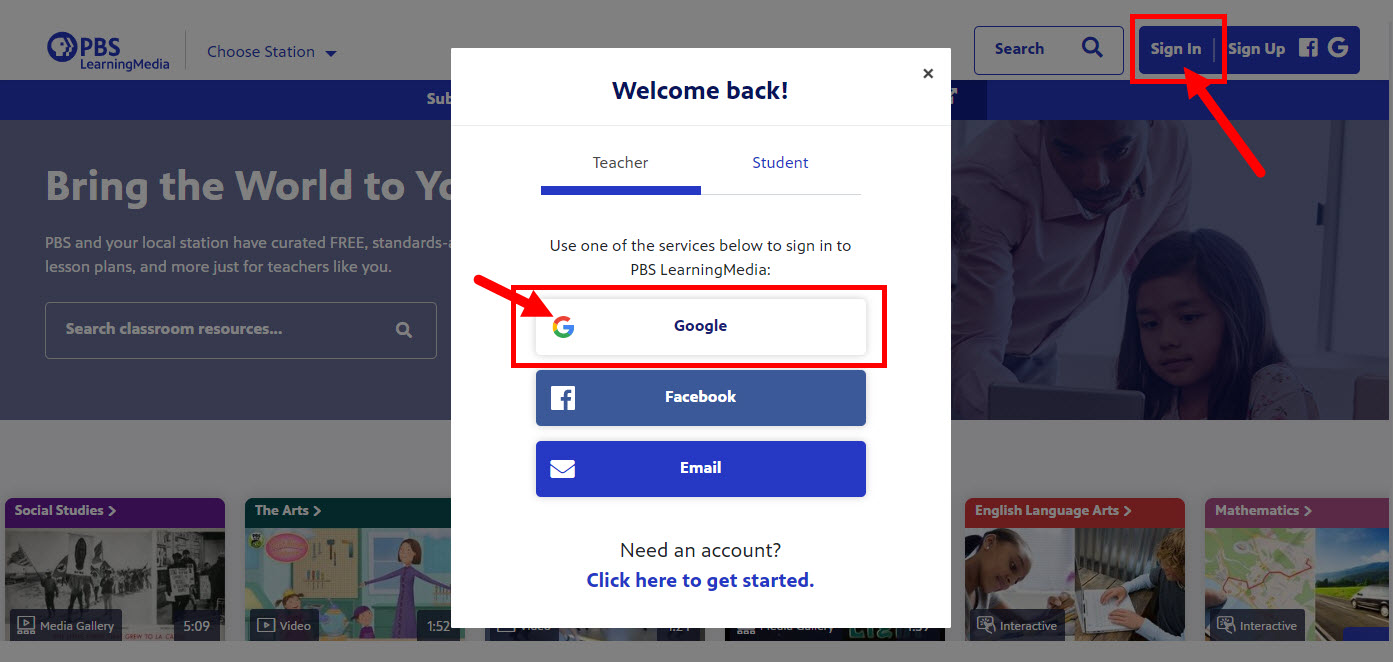
- Click Sign In on the www.pbslearningmedia.org website and sign in with your teacher Gmail account (Figure 1). This is the email address that is associated with your Google Classroom account.
Figure 1
- Hover over your name in the upper right corner and click Classes (Figure 2).

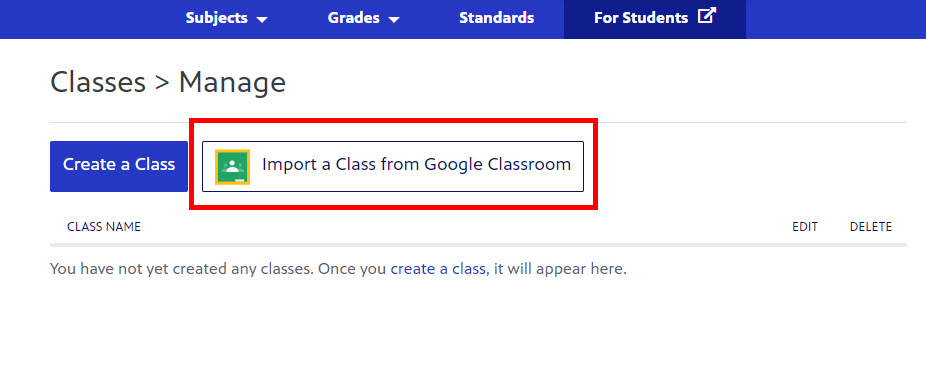
- Click Import a Class from Google Classroom (Figure 3).
Figure 3
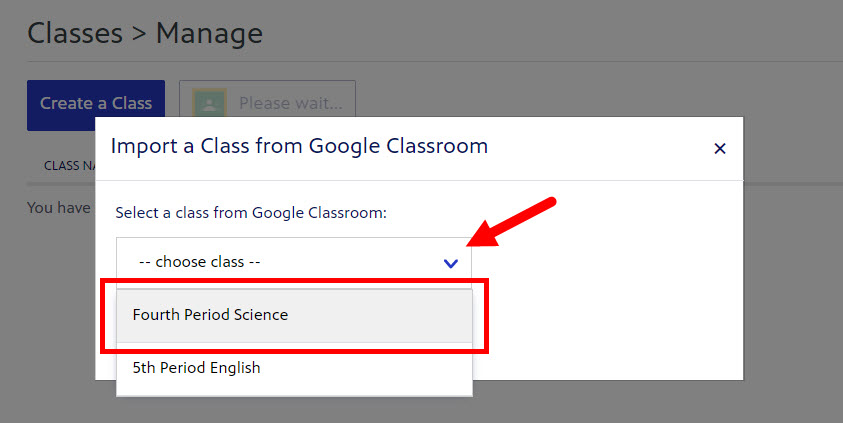
- Click the Select a class from Google Classroom dropdown menu and click the name of the class that you want to import (Figure 4).
If you are using Google Classroom for the first time you will be asked to choose an email address before this step.
Figure 4
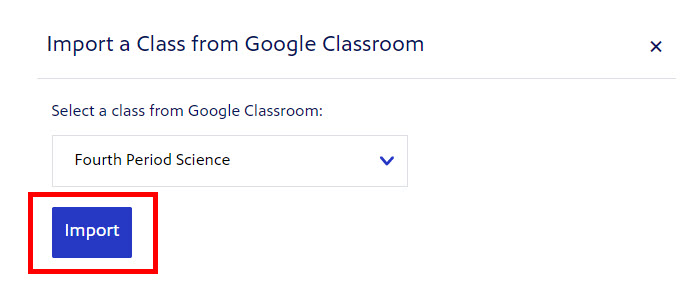
- Click Import (Figure 5).
Figure 5
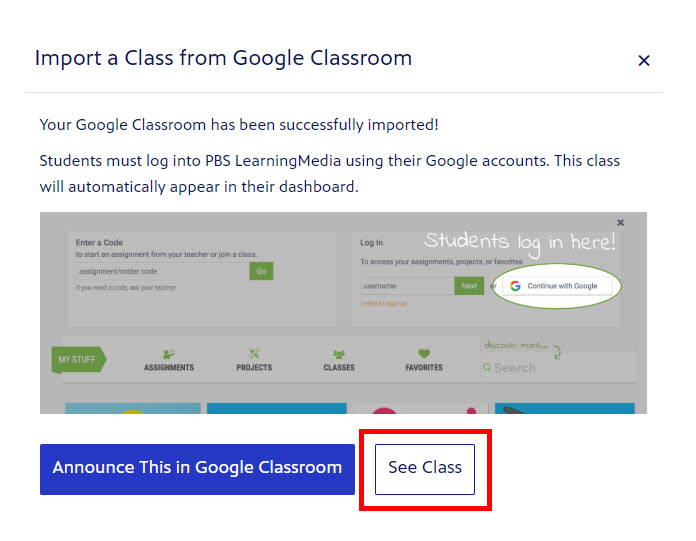
- Click See Class to view the students who were imported to PBS LearningMedia (Figure 6). All students are listed. If new students join your class, import them into PBS LearningMedia by clicking Re-Import Students from Google Classroom.
* Note for Teachers: You cannot give students assignments until the students have activated their account by logging in to the PBS LearningMedia student site with their Google account. Accounts that have not yet been activated are denoted by a yellow icon, as seen in Figure 7.
Figure 6
- Accounts that have not yet been activated display a yellow icon (Figure 7). Assignments cannot be assigned to these students until they log in to the PBS LearningMedia student site with their Google account.
Figure 7
![]()
How to assign a PBS LearningMedia resource to your Google class
Before assigning a PBS LearningMedia resource to your Google class, be sure all students have already logged into PBS LearningMedia with their Google account.
- From the PBS LearningMedia homepage, type keywords in one of the search textboxes to search for the resource you want to assign to your students (Figure 1).
Figure 1

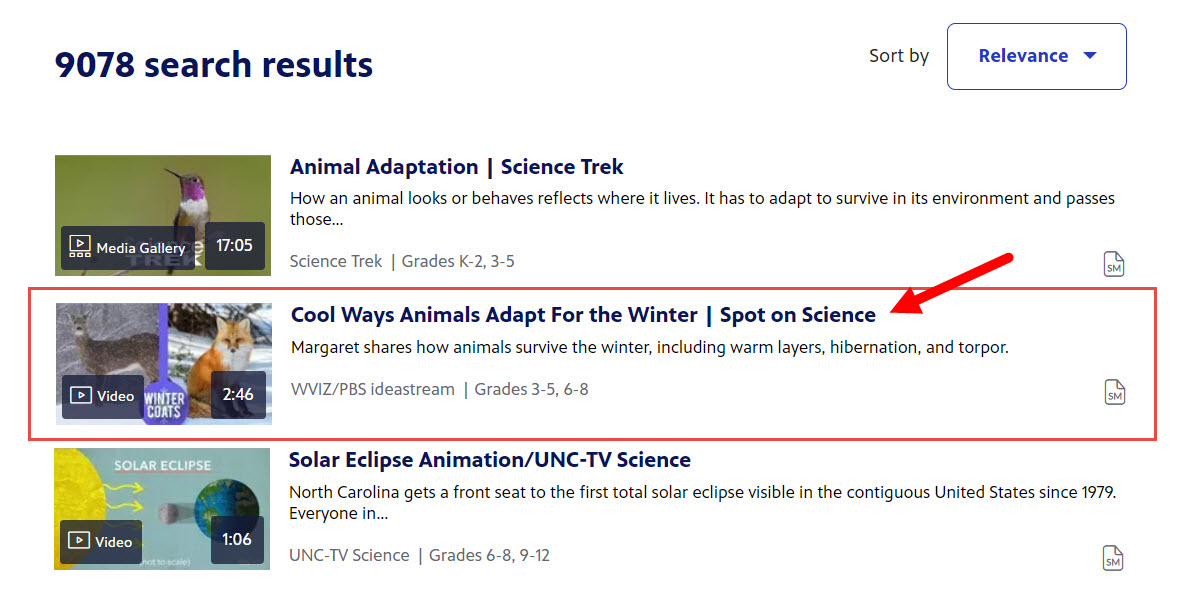
- Click the title of the resource that you want to assign to your students (Figure 2).
Figure 2
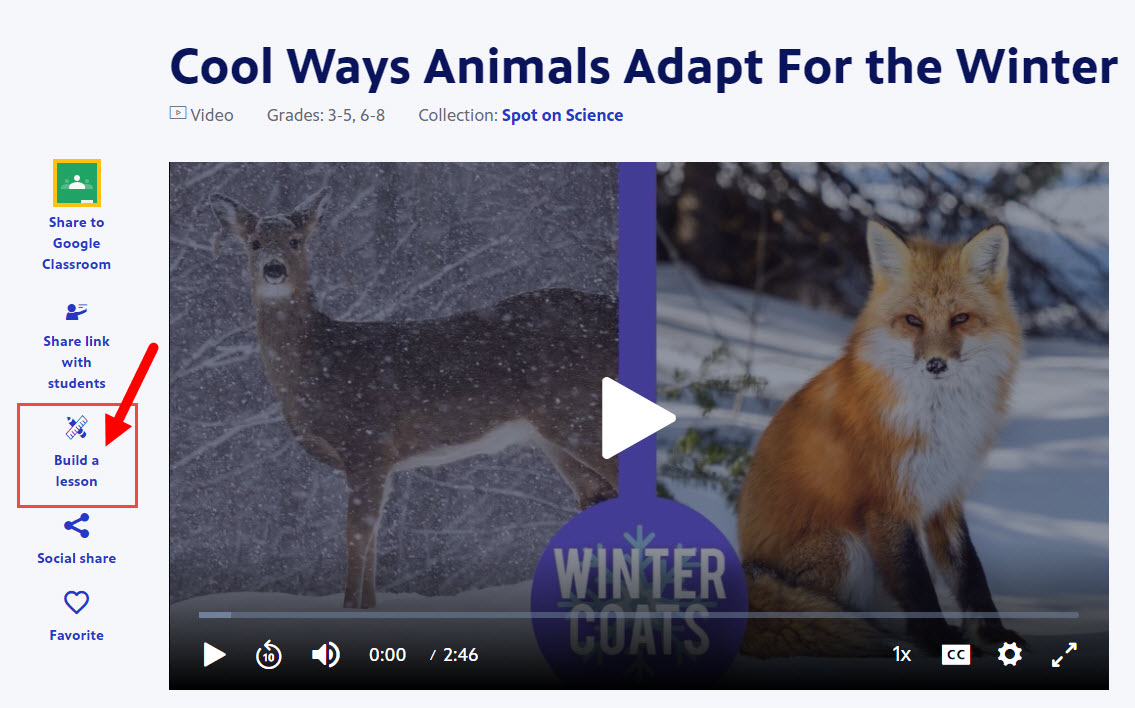
- On the left side of the resource, click Build a lesson (Figure 3).
Figure 3
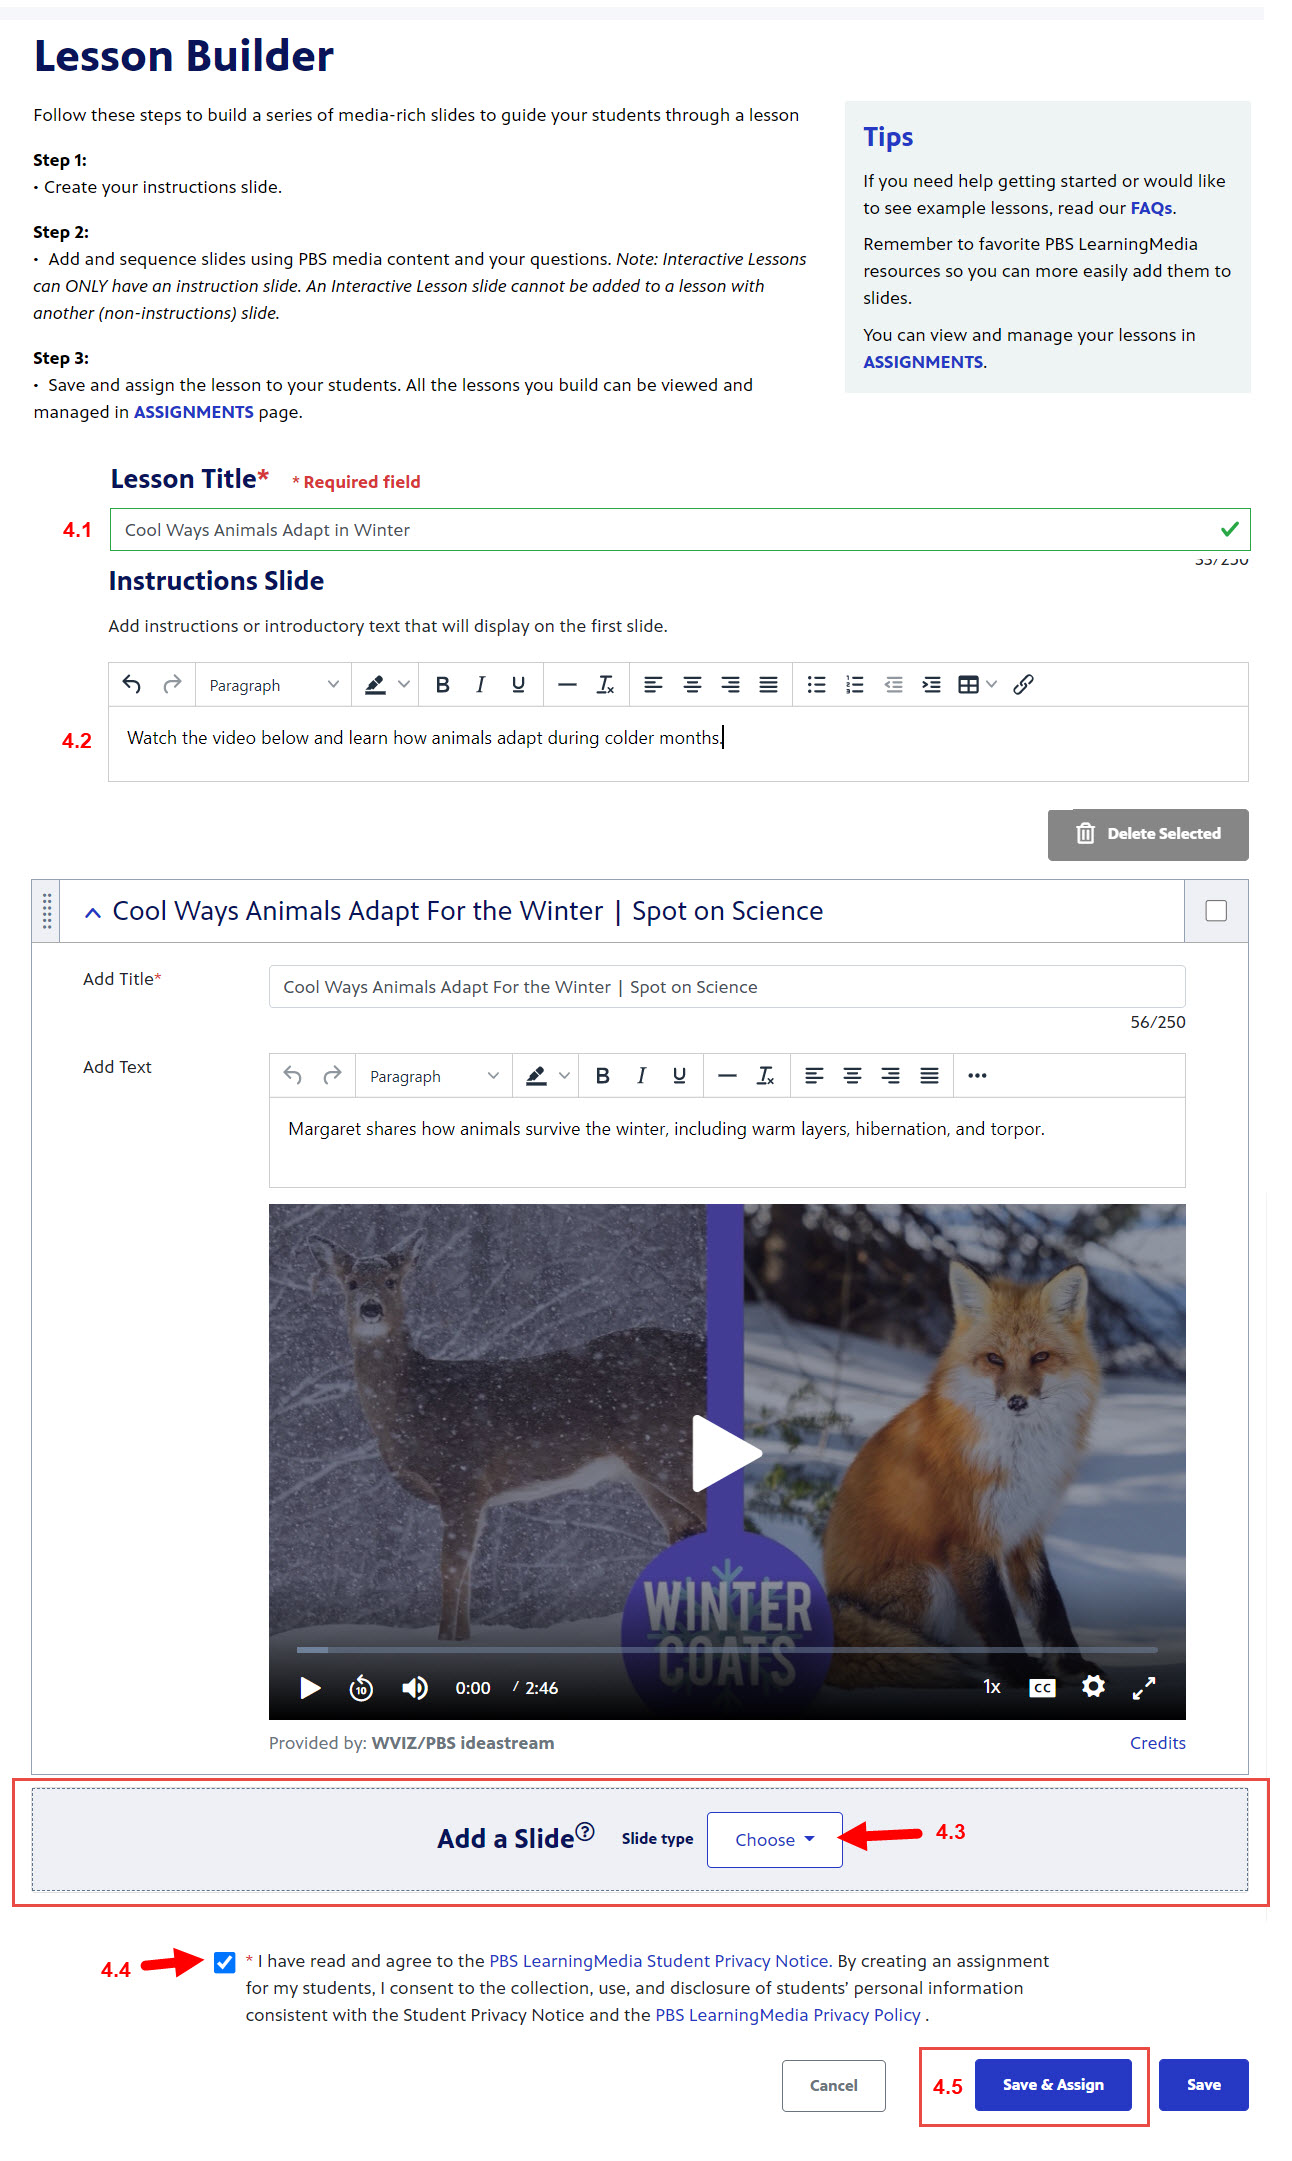
- The resource displays as a lesson with all elements automatically populated (Figure 4).
- In the Lesson Title textbox, type a title for this lesson (Figure 4.1).
- In the Instructions slide textbox, provide some guidance for your students on what you expect them to do with the lesson you are assigning to them (Figure 4.2).
- In the Add a Slide section, click the Choose dropdown menu to add additional slides to your lesson, if desired (Figure 4.3).
- Click the checkbox acknowledging the privacy policy (Figure 4.4).
- Click Save & Assign (Figure 4.5).
Figure 4
- When the popup box appears, click Assign to a Google Classroom class (Figure 5).
Figure 5
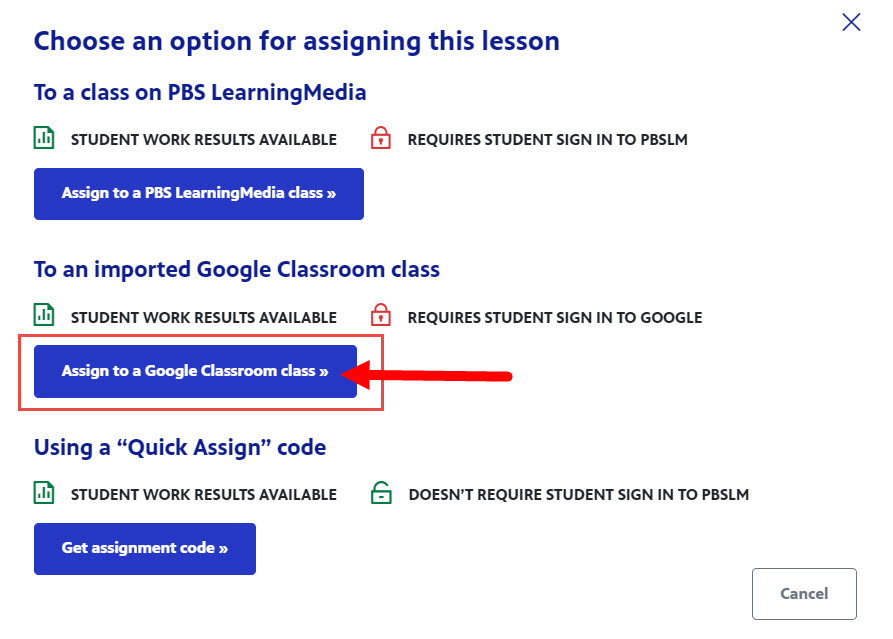
- Click the name of the class to which you want to assign the lesson (Figure 6.1).
- Click Next: Select Students (Figure 6.2).
If the Google class does not display, click Import class from Google Classroom.
Figure 6

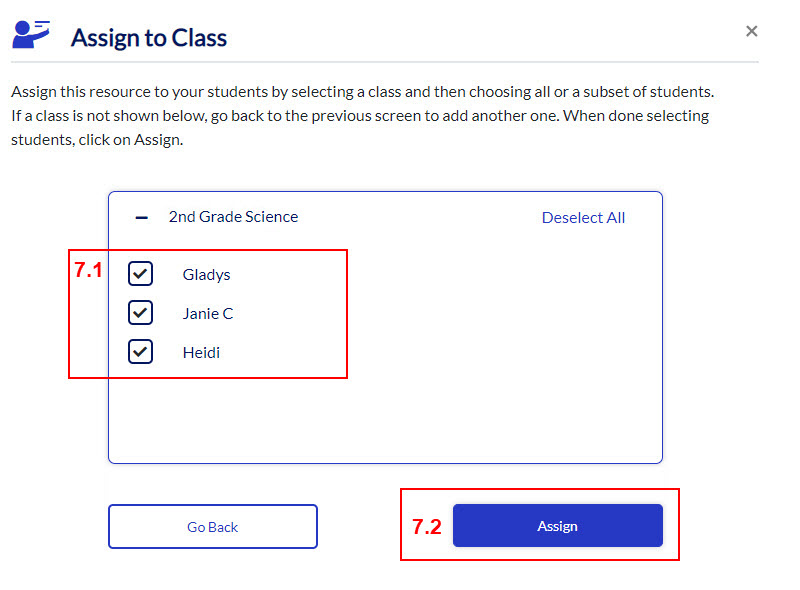
- All student names are checked by default (Figure 7.1). Click the checkbox next to any student you do not want to include in this assignment. The checkbox displays without a checkmark, indicating that the lesson will not be assigned to that student.
- When finished, click Assign (Figure 7.2).
Figure 7
How a student completes an assignment
Once you have assigned a resource to your student, the student should open Google Classroom using their Gmail account that is associated with your Google Classroom. View student instructions
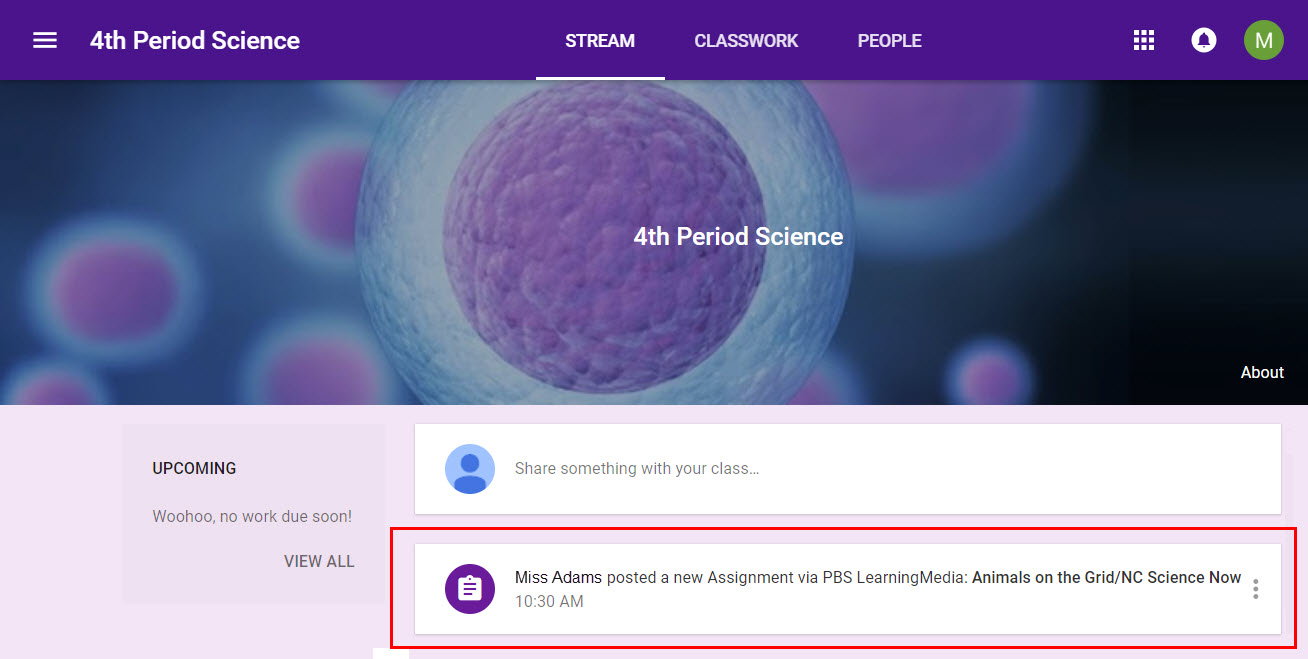
- The student's Google Classroom dashboard displays a notification that their teacher has posted a new assignment. The student clicks the notification(Figure 1).
Figure 1
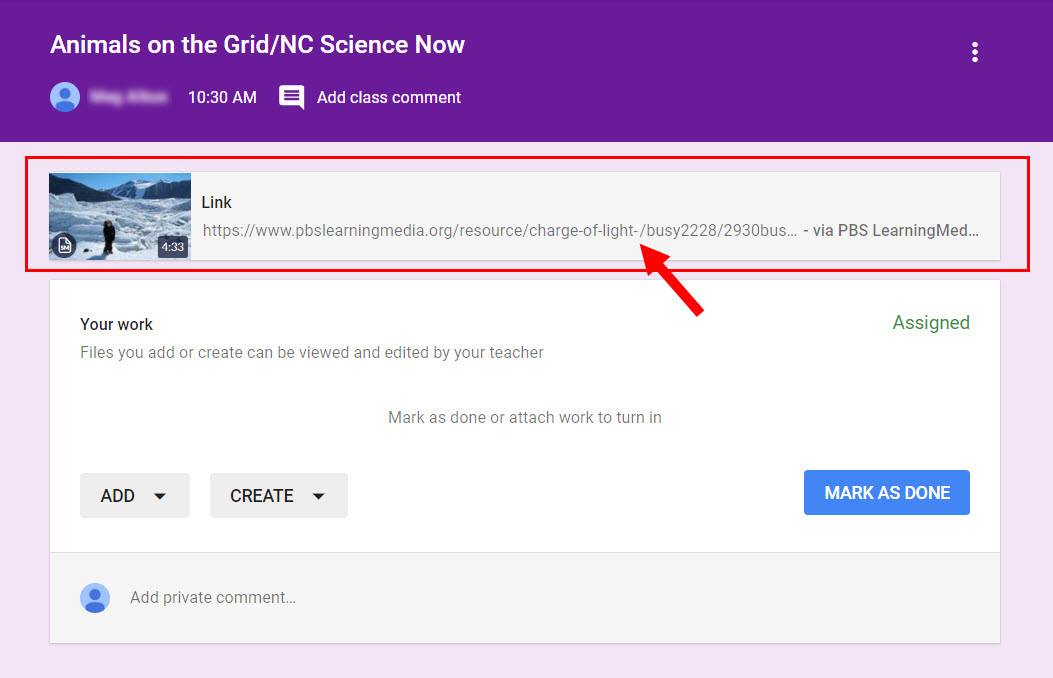
- The link to the PBS LearningMedia website displays (Figure 2). The student should click the link.
Figure 2
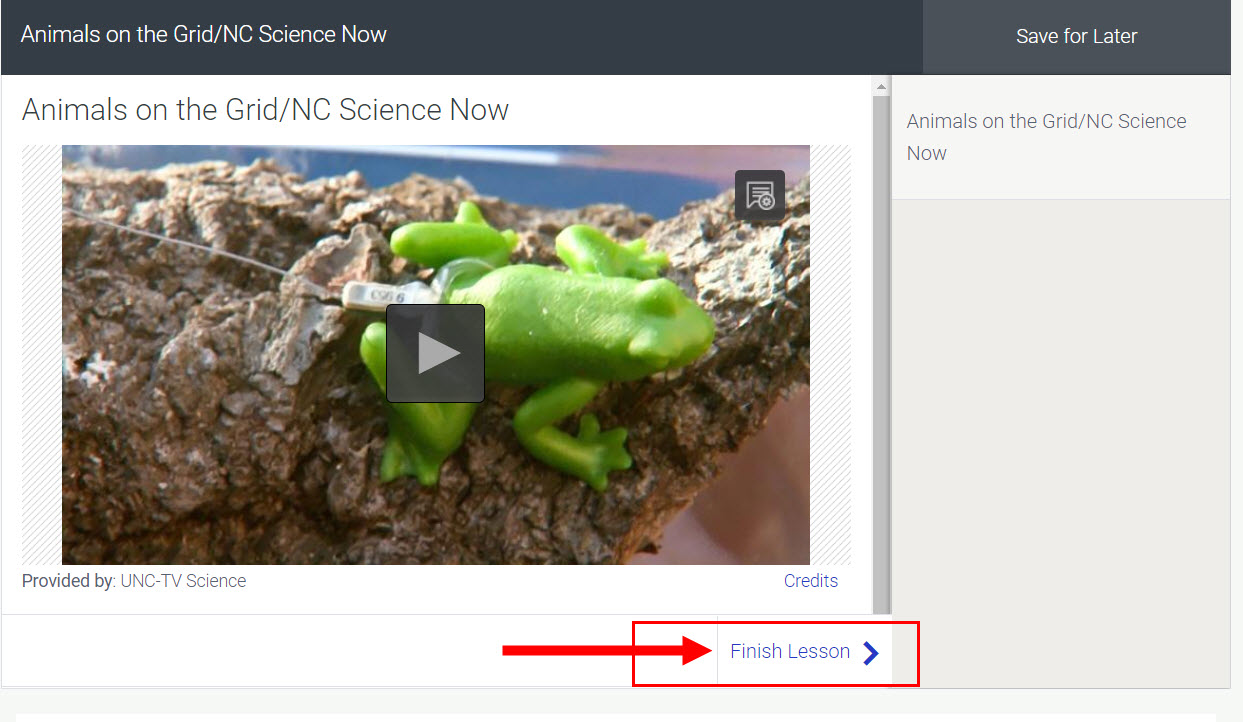
- The student is taken directly to the assignment on the PBS LearningMedia website. When they have finished the assignment, they should click Finish Lesson (Figure 3).
Figure 3
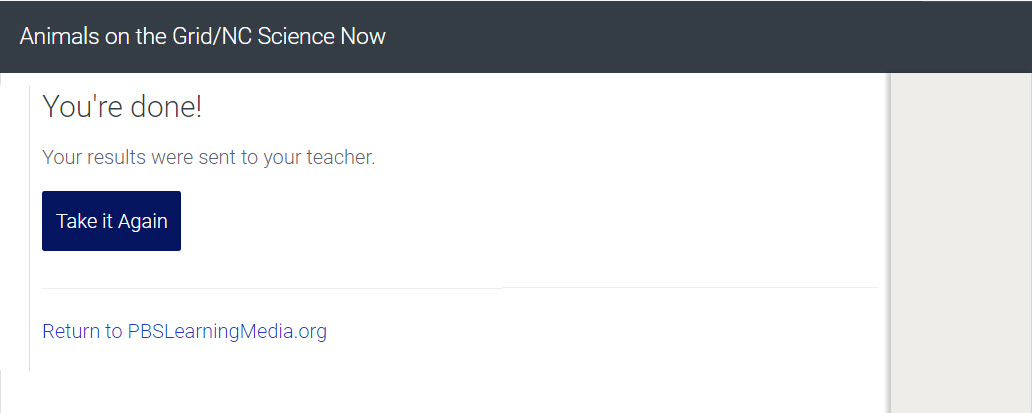
- A notification displays on the student's screen indicating that they have finished the assignment and it has been sent to their teacher (Figure 4).
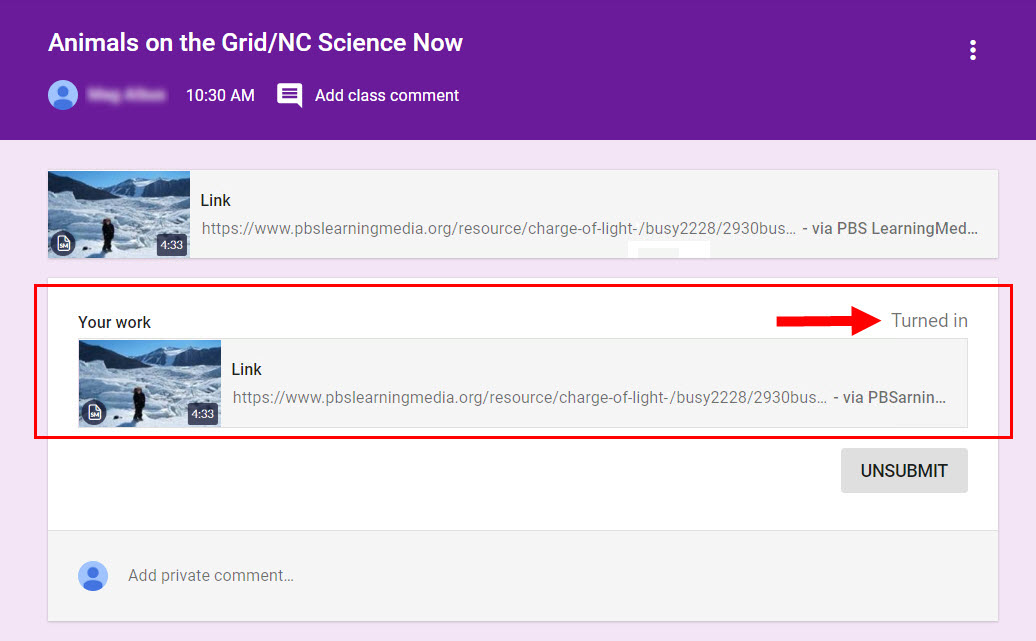
- When the student returns to Google Classroom, a message displays that they have turned in the assignment (Figure 5).
Figure 5
How to view student results
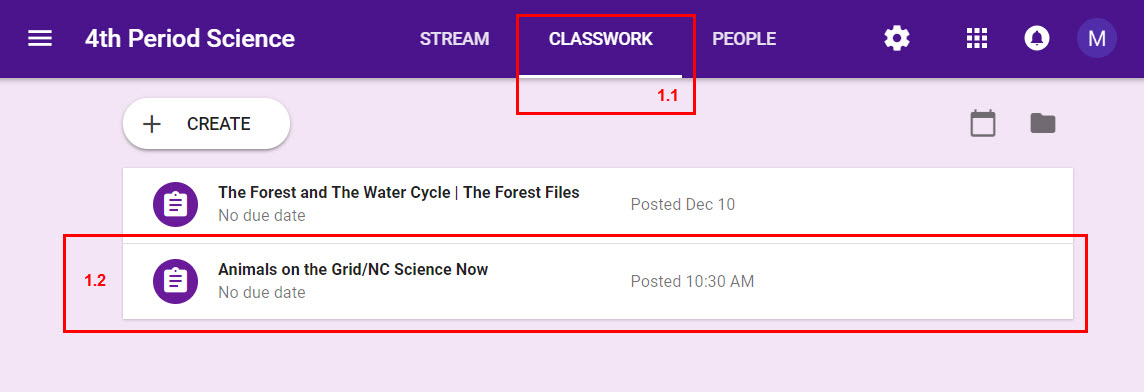
- To check your students' results, go to Google Classroom and click CLASSWORK (Figure 1.1).
- Click the link to the assignment you want to check (Figure 1.2).
Figure 1
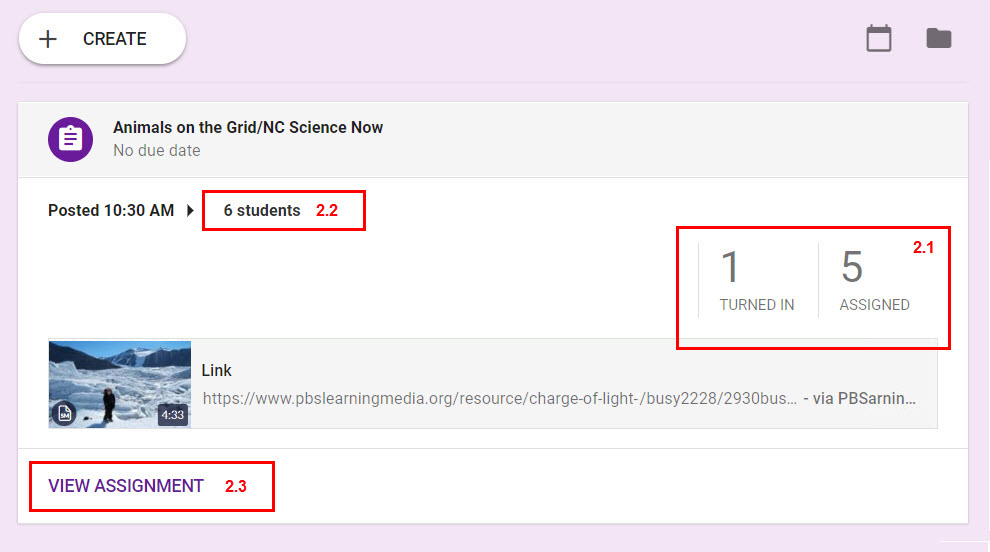
- The assignment dashboard displays:
- How many students have turned in their work (Figure 2.1)
- How many students were assigned the resource (Figure 2.2)
- A link to view the assignment (Figure 2.3).
- All links are clickable.
Figure 2
The Google Classroom add-on is a way for teachers to integrate Google Classroom with their PBS LearningMedia work and streamline the process of sharing files between teachers and students. Anyone using this feature must have a Google Classroom account with the Teaching and Learning Upgrade or Google Workspace for Education. When a teacher opens the add-on within Google Classroom, they are prompted to sign in to PBS LearningMedia with their Google account. This account must match Google Classroom, otherwise an error message will display.
First time using Google Classroom with PBS LearningMedia? Click here to walk through it
How to use the Google Classroom add-on
This section demonstrates how to use PBS LearningMedia content with Google Classroom if your admin has already set up add-ons for your district.
Using Google Classroom requires cookies to be enabled. Learn how to enable cookies
- Go to https://classroom.google.com/, follow the prompts to log in with your teacher credentials. Once you are logged in and see your classes, click on the class to which you want to add PBS LearningMedia content (Figure 1).
Figure 1

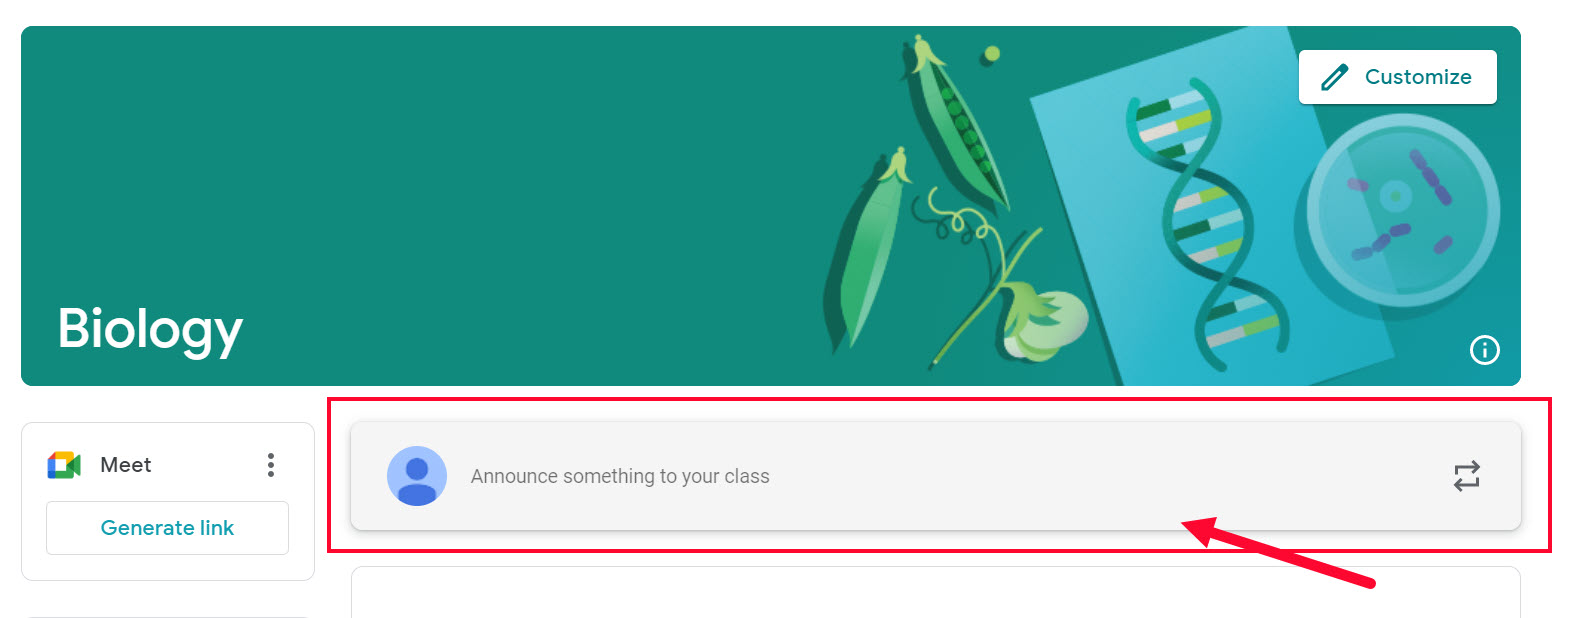
- Click Announce something to your class to expand the menu of options (Figure 2).
Figure 2
- At the bottom of the window, click Add-ons (Figure 3).
Figure 3

- When the menu displays, click PBS LearningMedia (Figure 4).
Figure 4

- The PBS LearningMedia site displays in a popup box. If you are already logged in to the PBS LearningMedia site, your login displays in the upper right corner (Figure 5.1).
- To go to the full PBS LearningMedia website to browse, click VISIT THE FULL SITE (Figure 5.2).
- In the search textbox, type keywords and click Search (Figure 5.3).
Figure 5

- Use the filters on the left side of the page to narrow your search (Figure 6.1).
- The selected resource displays (Figure 6.2).
- Click Assign (Figure 6.3).
Figure 6

- The PBS LearningMedia resource is incorporated into your Google Classroom (Figure 7).
Figure 7

- Click the title to preview the resource. The student view displays within Google Classroom (Figure 8).
Figure 8

How to get started with Google Classroom
For anyone who has not yet used Google Classroom, this section shows you how to get started. Before beginning, be sure you have a Google Classroom and PBS LearningMedia account.
Using Google Classroom requires cookies to be enabled. Learn how to enable cookies
- Go to https://classroom.google.com/, hover over the profile icon and under Sign in, click Google Classroom (Figure 1).
- Follow the prompts to log in with your teacher credentials.
Figure 1

- Google terms of service and privacy policies display. Click I understand to proceed with the setup (Figure 2).
Figure 2

- Be sure the correct account displays and click Continue (Figure 3).
Figure 3

- Type all of the class information in the fields provided (Figure 4.1).
- Click Create (Figure 4.2).
This step could take a few seconds to complete.
Figure 4

- Click Announce something to your class to expand the menu of options.
- At the bottom of the window, click Add-ons (Figure 5).
Figure 5

- When the menu displays, click PBS LearningMedia (Figure 6).
Figure 6

- Click Sign in with Google (Figure 7).
Figure 7

- Click the name of the account you are using to log in to add-on (Figure 8).
Figure 8

- A list of what the Add-on is able to access displays. Click Allow to continue (Figure 9). If you choose not to accept these, click Cancel to back out.
This step only displays the first time using the Add-on.
Figure 9

- After allowing the permissions, you are taken to the PBSLearningMedia site where you can search or browse for a resource (Figure 10).
Figure 10

How to enable cookies
If you are experiencing issues accessing the Google Classroom add-on, you may need to enable cookies, which you can do from your browser settings.
- How to enable cookies in Chrome: https://support.google.com/accounts/answer/61416
- How to enable cookies in Safari: https://support.apple.com/kb/PH17191
- How to enable cookies in Firefox: https://support.mozilla.org/en-US/kb/websites-say-cookies-are-blocked-unblock-them
