Class Rostering and Assignments
The class rostering feature in PBS LearningMedia enhances the working relationship between teachers and students by providing the ability for teachers to assign lessons to individual students or groups of students. Teachers can easily keep track of students' progress and completion of assignments. Student progress and results are displayed in the class rostering section of the PBS LearningMedia website, which can be accessed by clicking your login name in the upper right corner and clicking Classes located in the dropdown menu or by clicking Classes in the left side navigation menu of your Dashboard.
Learn about class rostering:
- How to create a class
- How to invite students to your class roster
- How to retrieve student login information
- How to unlock a student account
- How to remove a student from a class roster
- How to edit a student's display name
Learn about assignments:
Requirements
To use the class rostering feature:
- Teachers must have standard Teacher PBSLM account. Learn how to create an account
- Students must have standard PBSLM student account which can be created at www.pbslearningmedia.org/student/. Learn how students create a account
Your Class dashboard
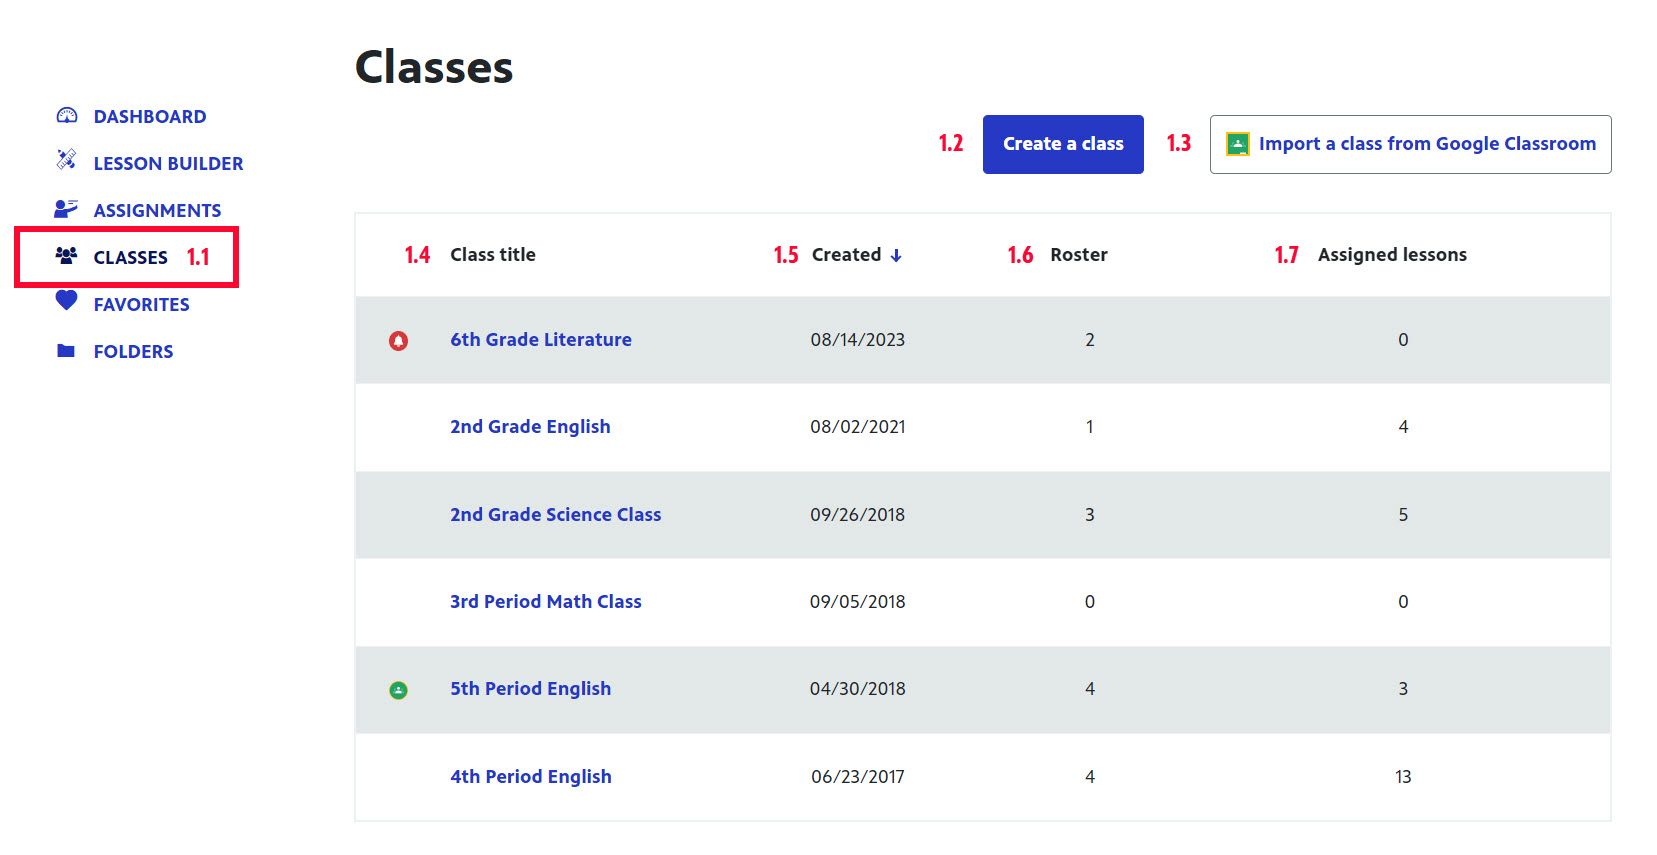
Your class dashboard contains basic information about your classes and rosters, as well as the number of assigned lessons to each class. The following image is a roadmap to all of your class dashboard features:
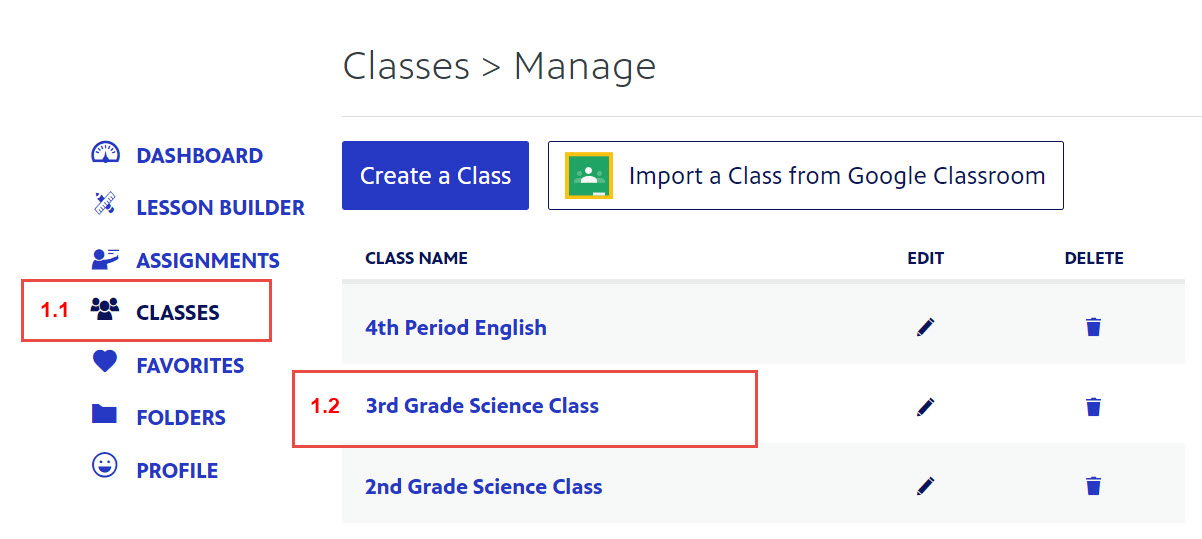
- Access your Classes dashboard by clicking CLASSES on the left navigation menu (Figure 1.1) or by clicking your login in the upper right corner and clicking Classes.
- To create a class, click Create a class in the upper right corner of your dashboard (Figure 1.2).
- To import a class from Google Classroom, click the Import a class from Google Classroom in the upper right corner of the dashboard (Figure 1.3).
- All of your classes are listed in the Class title column (Figure 1.4). Click each class title to access details for that class.
- The Created column displays the date on which each class was created (Figure 1.5).
- The Roster column displays how many students are currently assigned to the associated class (Figure 1.6). Learn how to add students to your roster
- The Assigned lessons column displays how many lessons have been assigned to the associated class (Figure 1.7). Learn more about Lessons
Figure 1
How to create a class
- From the PBS LearningMedia homepage, in the upper right corner of the page, hover over your name and click Classes (Figure 1).
Figure 1

- Any classes you already have set up display (Figure 2.1).
- Click Create a class (Figure 2.2).
Figure 2

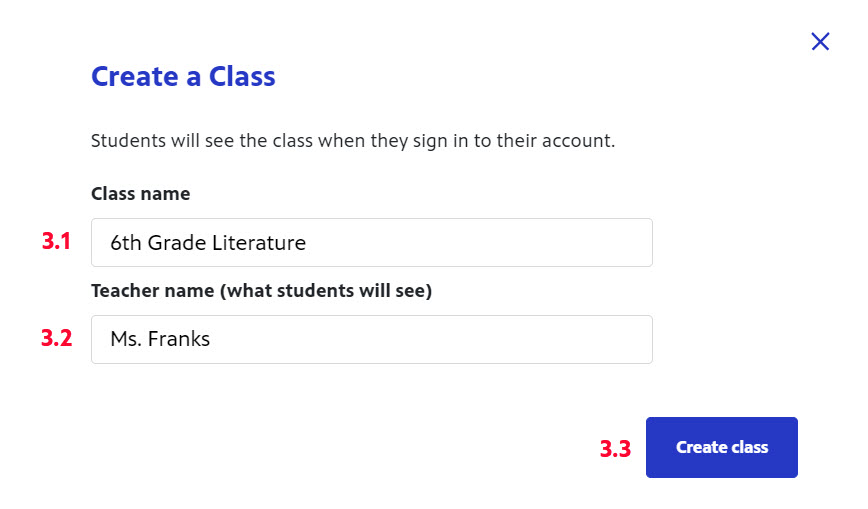
- In the Class Name textbox, type a name for your class (Figure 3.1).
- The name should be an identifier that is easy to distinguish from other class rosters you've created. Try to use language that is specific to the class, for example: 4th Grade English.
- The name that is associated with your www.pbslearningmedia.org login automatically displays in the Teacher Name textbox (Figure 3.2).
- You may want to modify this field to display a name that is more familiar to your students. For instance, if your login is Jan Kendricks, you may want to change it to a salutation that you are known by to your students, such as Ms. Kendricks.
- Click Create class (Figure 3.3).
Figure 3
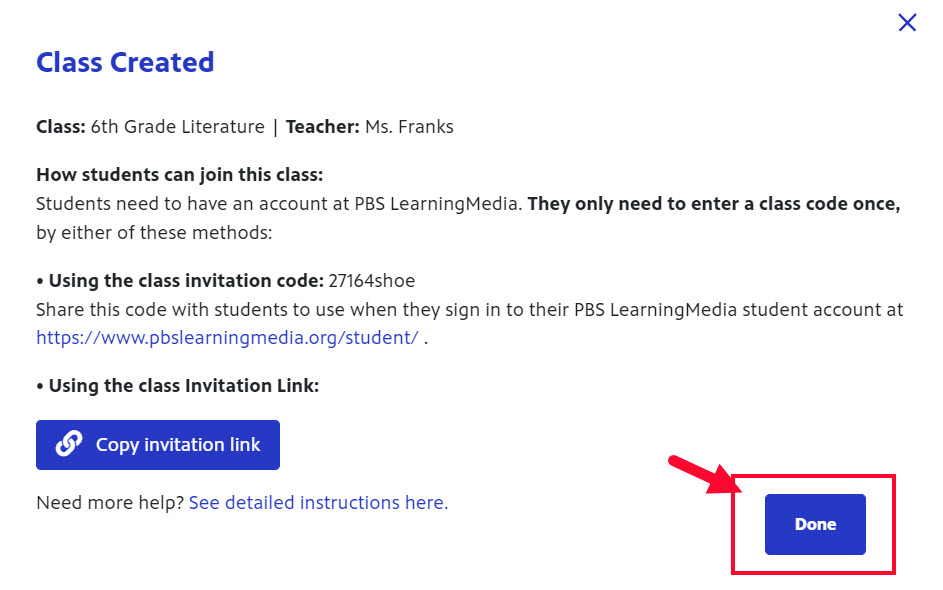
- Your class has been created. Please see the next section titled How to assign students to your class roster, for instructions on using the options displayed in this screen.
- Click Done (Figure 4).
Figure 4
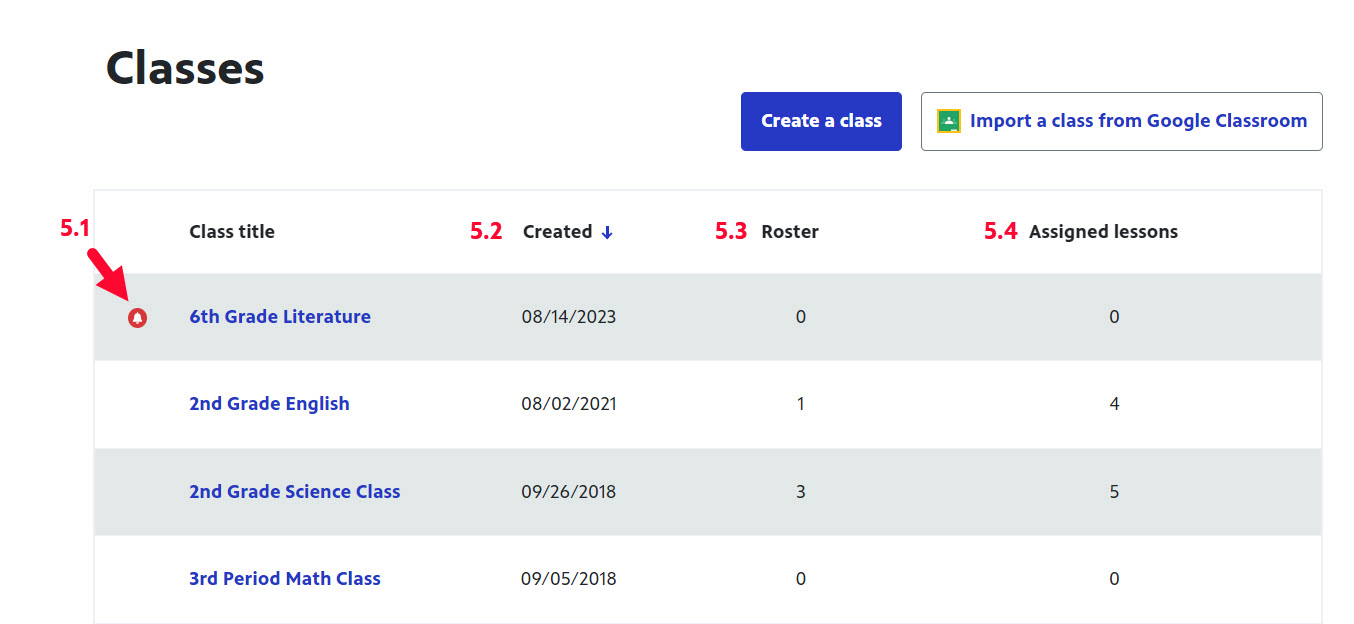
- Your new class displays at the top of your Classes list and has a red icon to the left of the class title, denoting that it is new (Figure 5.1).
- The Created column displays the date on which the class was created (Figure 5.2).
- The Roster column displays the number of students in your class roster (Figure 5.3).
- The Assigned lessons column displays the number of lessons assigned to the class (Figure 5.4).
Figure 5
How to invite students to your class roster
Now that you've set up a class roster, let's begin populating it with students. Begin by sending your students a class invitation link or an invitation code. This section shows you how.
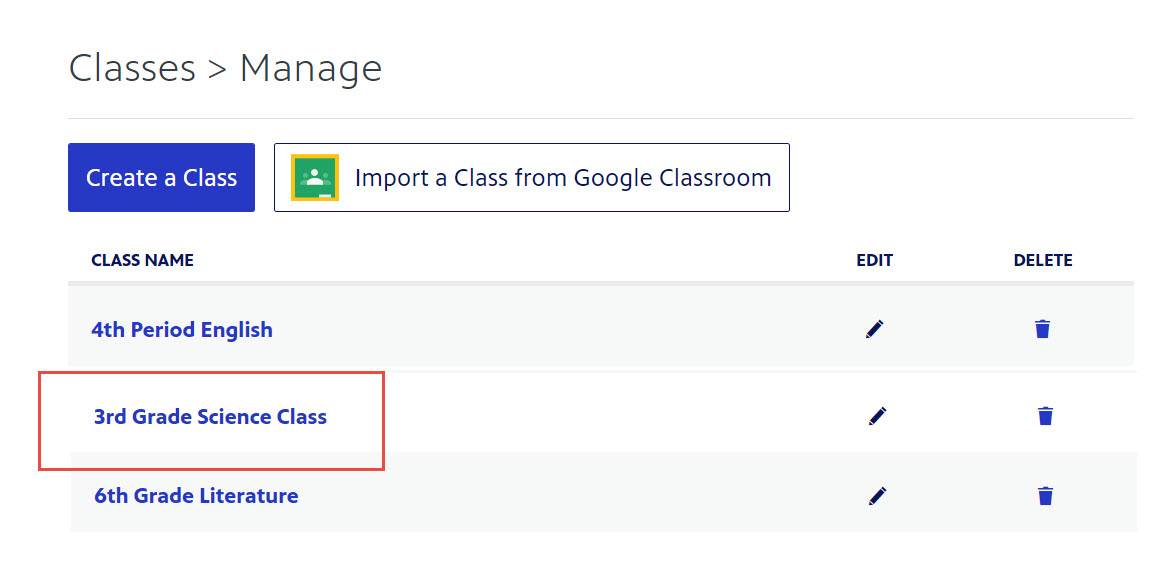
- From your main Classes page, click the class to which you want to add students (Figure 1).
Figure 1

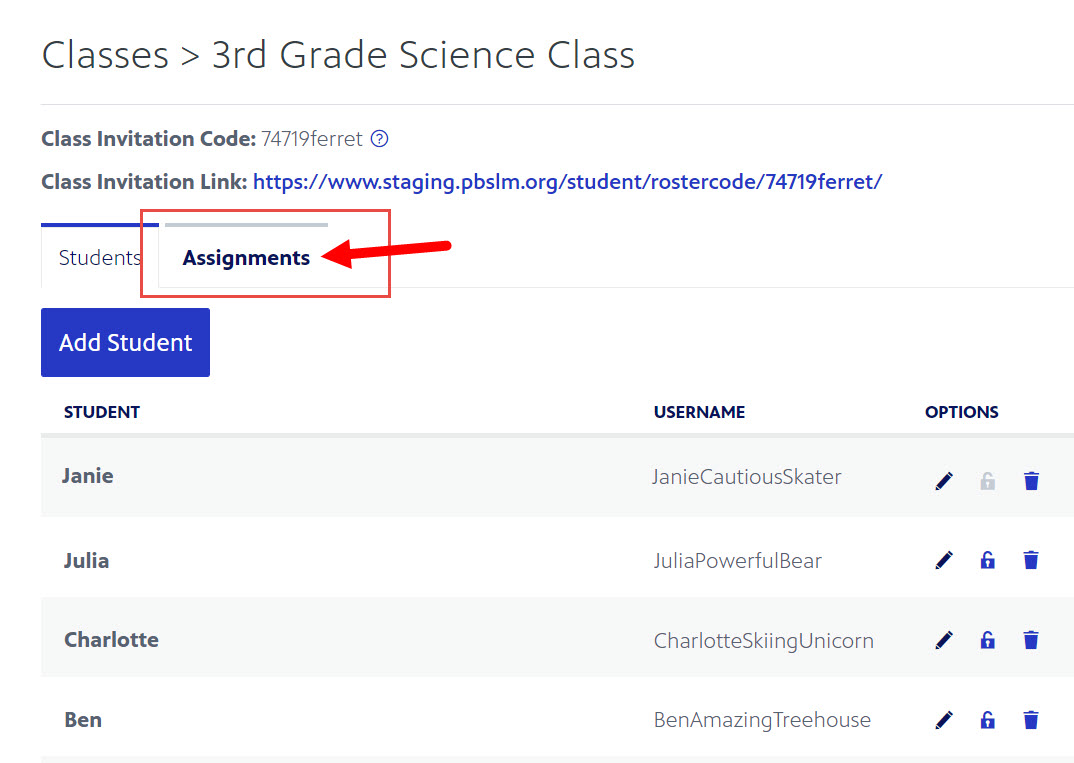
- Students already in your class roster display. To add a new student, click Add Student (Figure 2).
Figure 2

A popup box displays and includes information for you to send to the student so they can be added to your class:
- Class name and teacher name: This is the name of your class and the name you established for yourself when you created the class (Figure 3.1). This is how students will see your name displayed for all things related to this class.
- Class invitation code: This is the code that you can share with students (Figure 3.2). Students can go to the student site and enter this code in the textbox provided on the right side of the top navigation bar. Students must be logged in to the student site to use the code.
- Class invitation link: The class invitation link directs students to the student site where they can enter their name in the popup box and be added to your class roster (Figure 3.3).
- When finished, click Done or the X in the upper right side of the box (Figure 3.4).
Figure 3

How a student is added to your class roster
After you have sent your students a link or code to join your class roster, there are steps the student must take to complete the process. This section outlines the steps a student must complete on their own to join your class roster.
- The student should first sign in to the student site in the upper right corner of the page (Figure 1.1).
- In the Enter code from your teacher textbox, they should type the class code that was sent by their teacher (Figure 1.2).
Figure 1

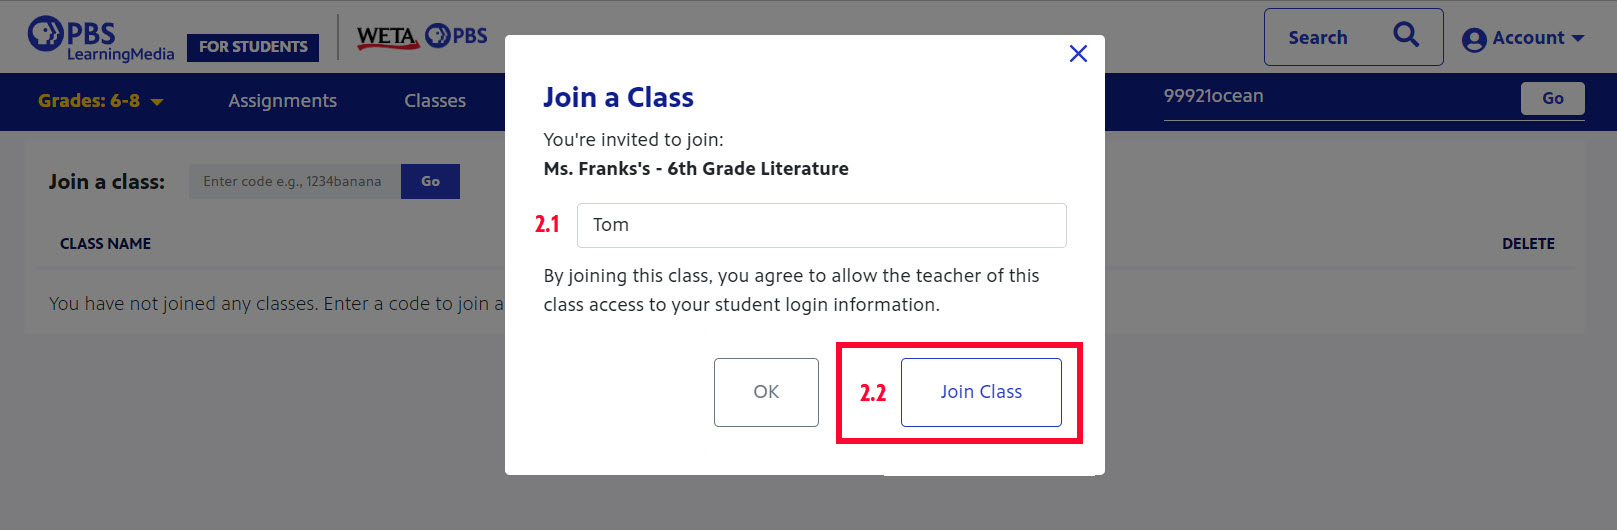
- The student is directed to a modal that displays the name of the teacher whose class the student is joining as well as the name of the class. In the textbox provided, the student should type their name (Figure 2.1). Just their first name is fine.
- When finished, the student should click Join Class (Figure 2.2).
Figure 2
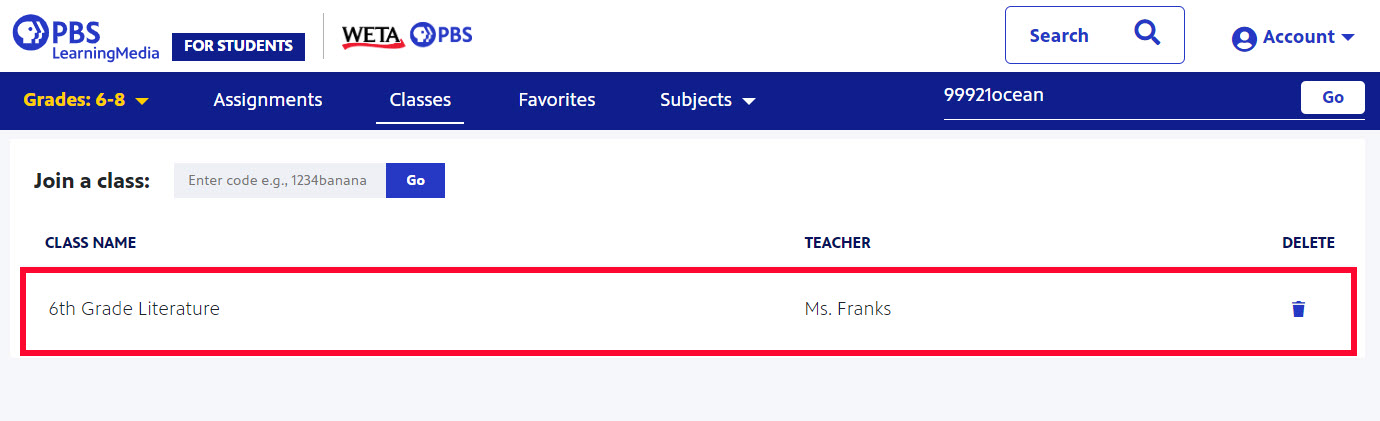
- The student has joined the class, which is displayed under the Classes section of their student site (Figure 3).
Figure 3
How to add assignments to your class
To use the class rostering feature, assignments must already exist within your class and you must have already assigned students to a class roster.
This section shows you how to add assignments to your class.
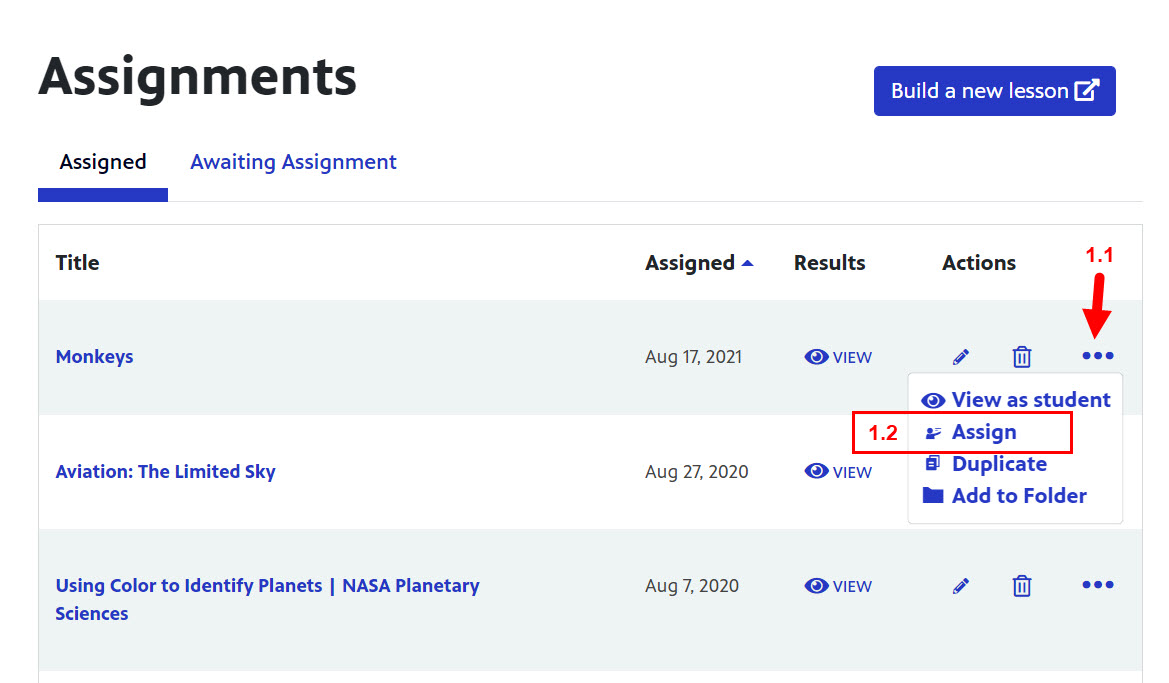
- Go to your Assignments dashboard and on the right side of the assignment you want to assign, click the three horizontal dots (Figure 1.1).
- When the dropdown menu displays, click Assign (Figure 1.2).
Figure 1
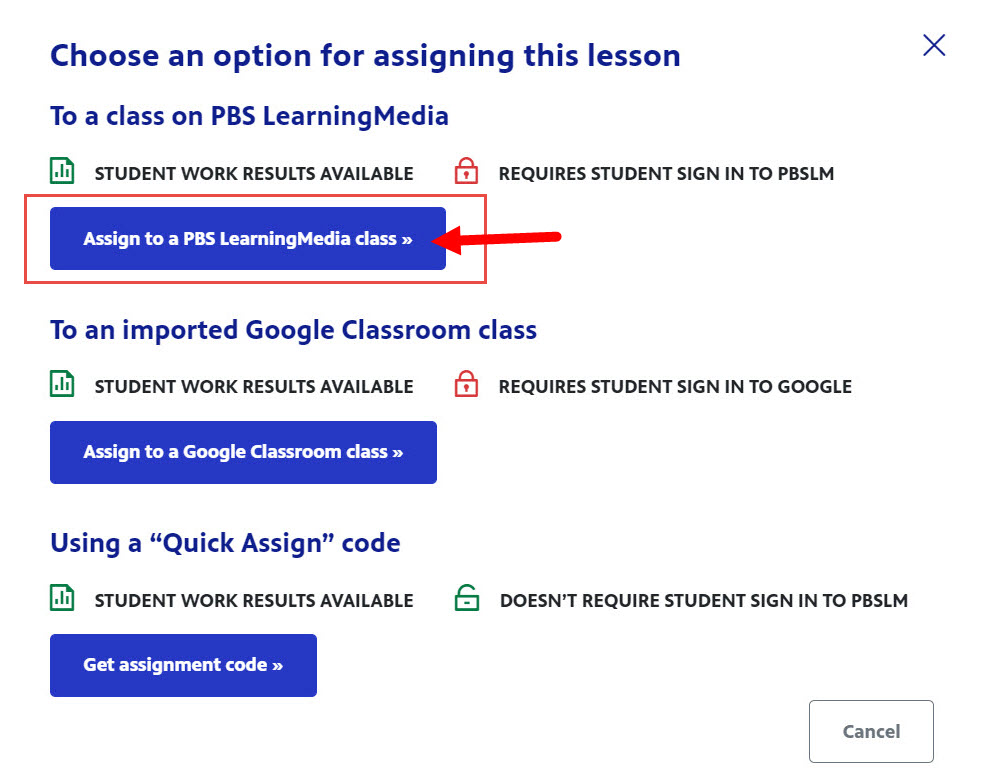
- Click the blue Assign to a PBS LearningMedia class button (Figure 2).
Figure 2
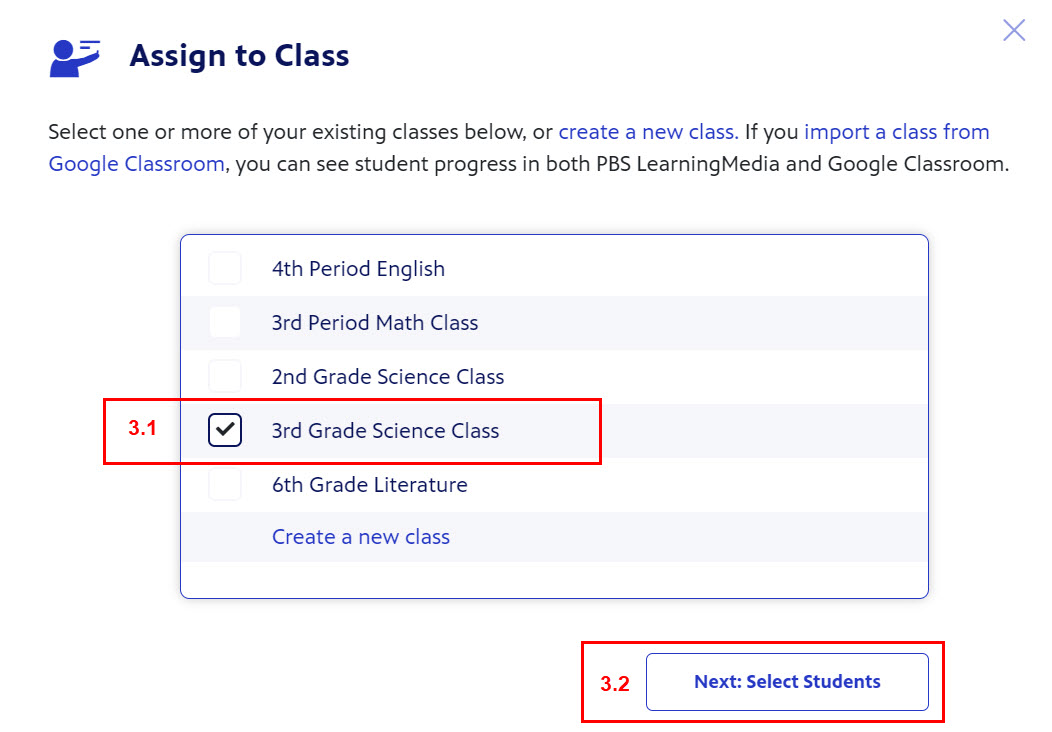
- When the list of your existing class rosters appears in the popup box, click the checkbox to the left of the name of the roster to which you want to add the assignment (Figure 3.1).
- Click Next: Select Students to select the students you want to have access to this assignment (Figure 3.2).
Figure 3
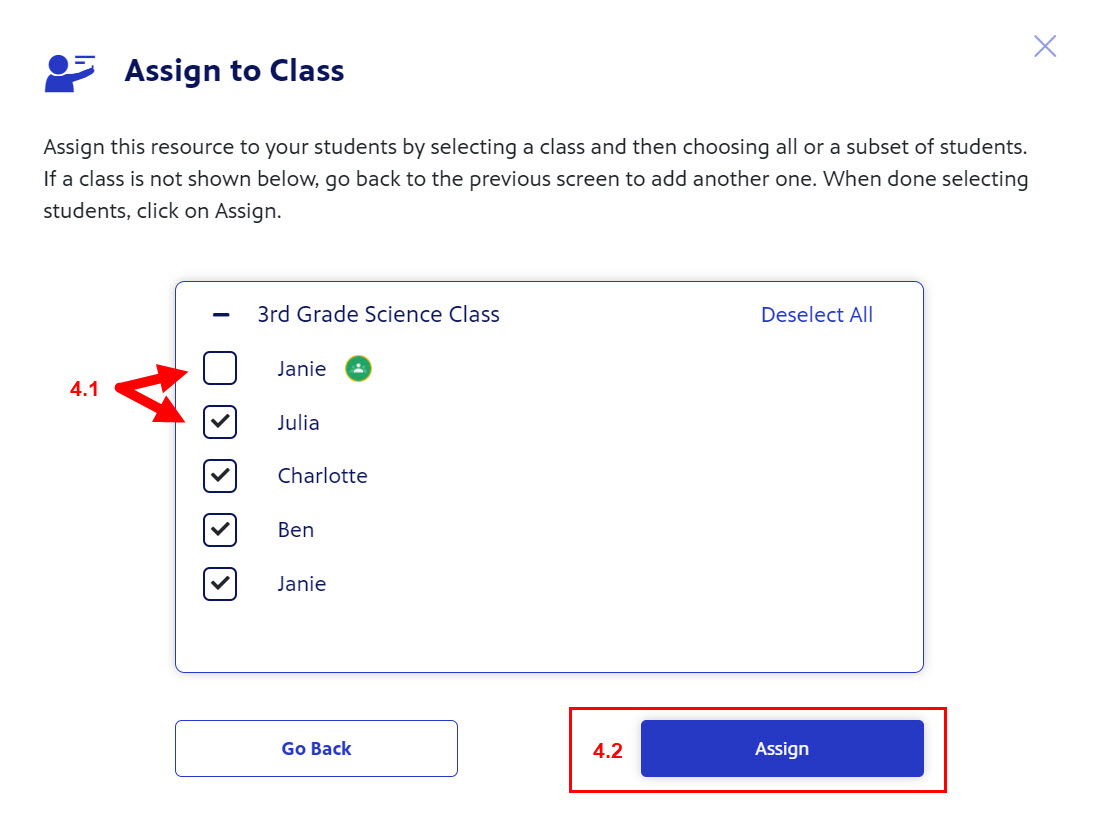
- All students are selected by default. If you wish to exclude a student from this assignment, click the checkbox next to their name to unselect them (Figure 4.1). An excluded student will display a blank checkbox and will not receive the assignment.
- When finished, click Assign (Figure 4.2).
Students who have been added to the class after the work has been assigned must have the assignment sent separately. Simply go back in and assign to those specific students only.
Figure 4
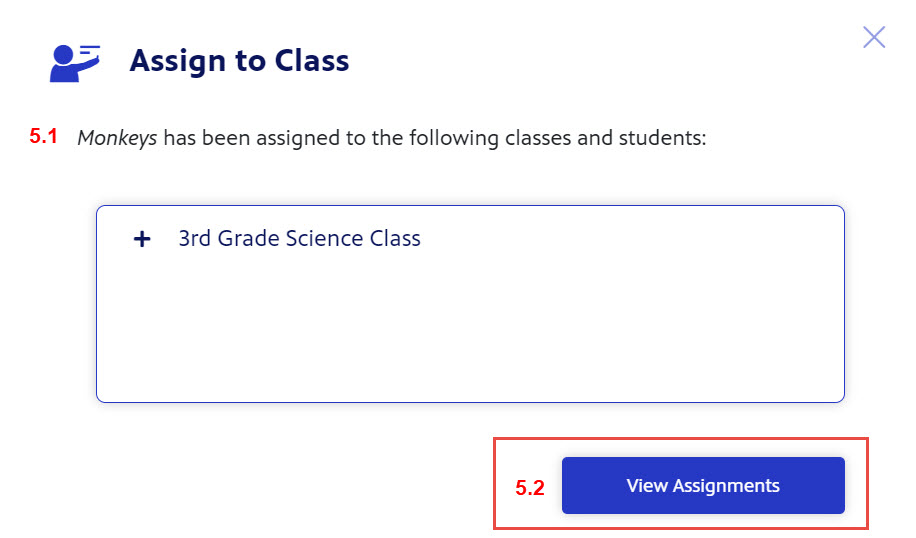
- A confirmation message appears stating the assignment has been sent to the selected class and students (Figure 5.1).
- Click View Assignments to return to your Assignments dashboard (Figure 5.2).
Figure 5
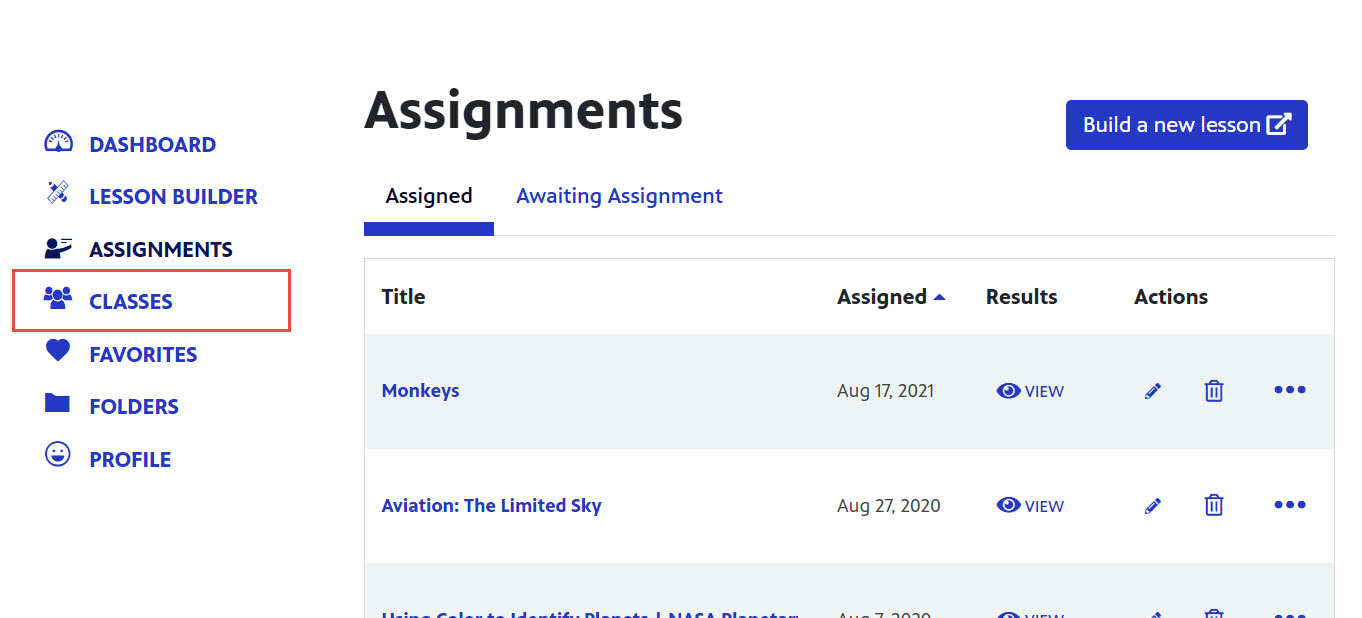
- Click Classes to view the class to which the assignment was sent (Figure 6).
Figure 6
- Click the name of the class to which the assignment was sent (Figure 7).
Figure 7
- All students in the class display. Click the Assignments tab (Figure 8).
Figure 8
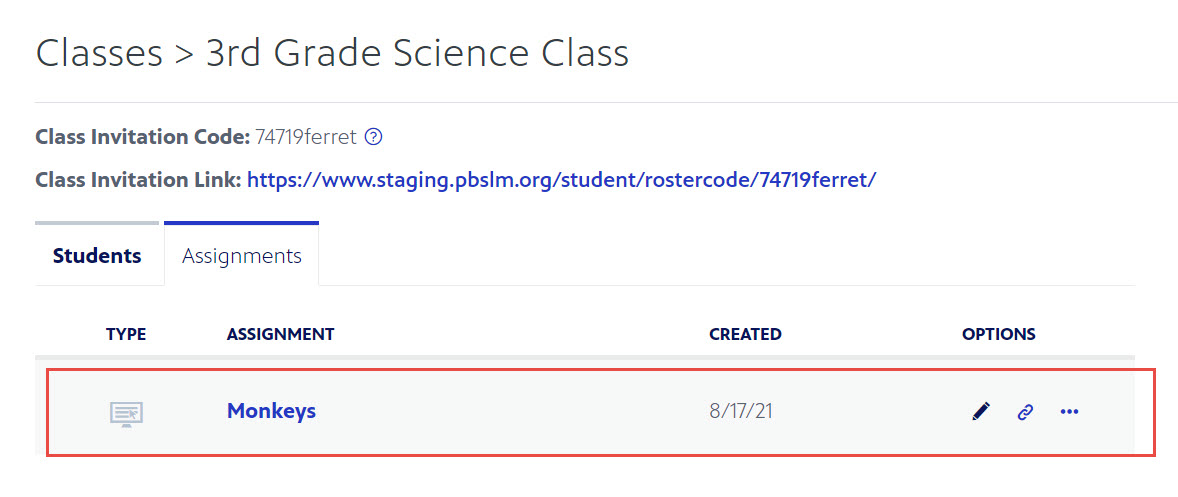
- The assignment that was sent to that class displays, as well as the class invitation code and link (Figure 9).
Figure 9
How to remove an assignment from a class roster
If you delete an assignment from your class, the assignment will be deleted from the entire system. You cannot retrieve an assignment once it has been deleted.
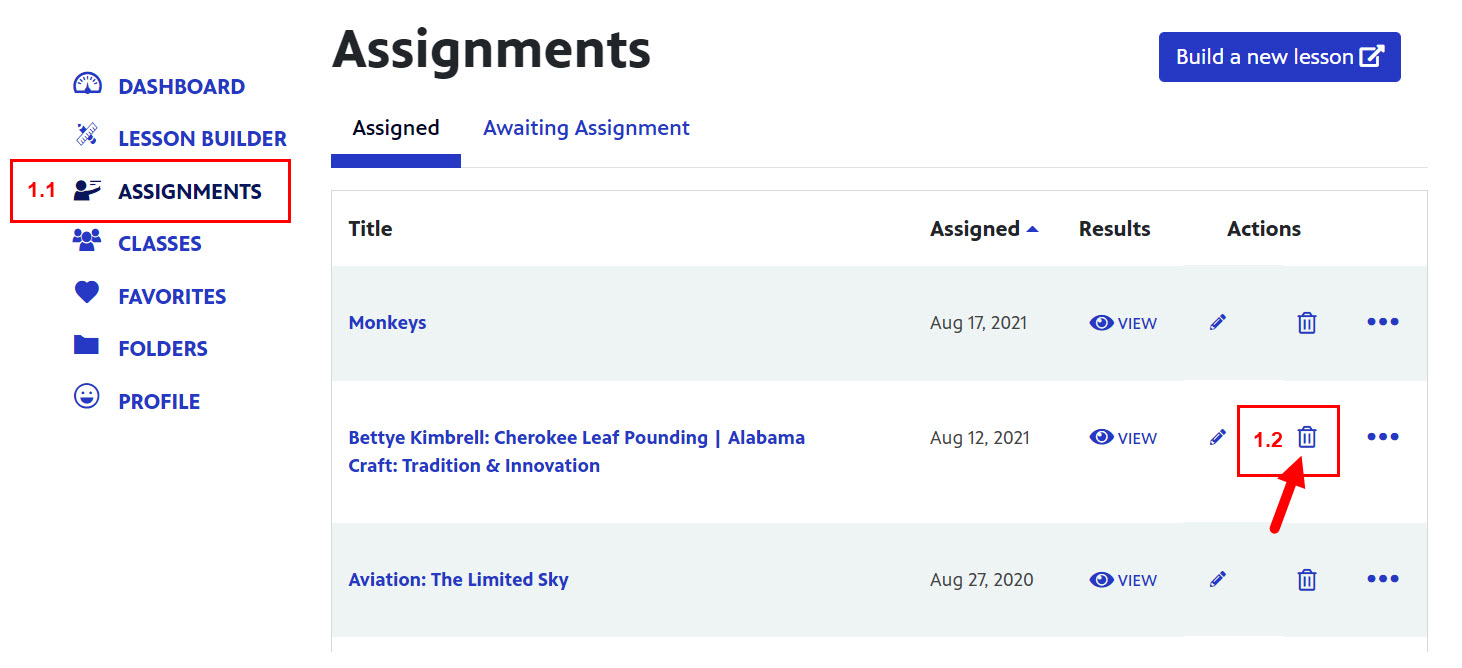
- From the left navigation menu on your Dashboard, click Assignments (Figure 1.1).
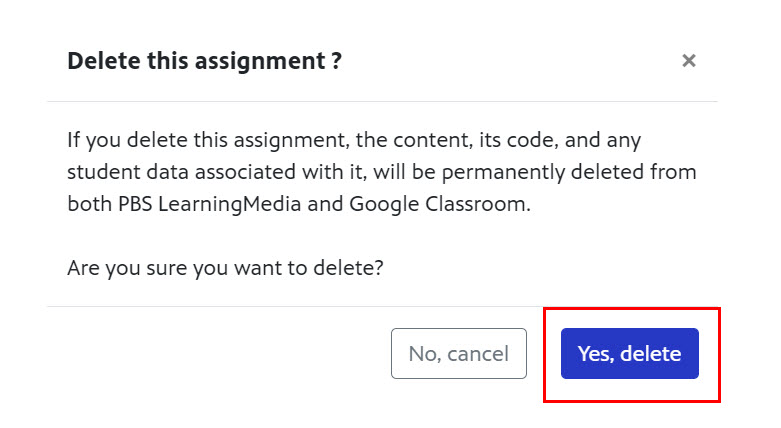
- To the right of the assignment you want to delete, click the trashcan icon (Figure 1.2).
Figure 1
- Click Yes, Delete (Figure 2). The assignment is removed from the class assignments and all of PBS LearningMedia.
If you delete an assignment from your class, the assignment will be deleted from the entire system. You cannot retrieve an assignment once it has been deleted!
Figure 2
How to view student results
Results for interactive lesson platforms and regular assignments are viewed differently in PBS LearningMedia. This section demonstrates how to view all assignments.
Interactive lesson platforms are independent online lessons that are hosted outside of PBS LearningMedia but the results for which can be accessed via class rostering. View an interactive lesson platform example
View regular assignment results
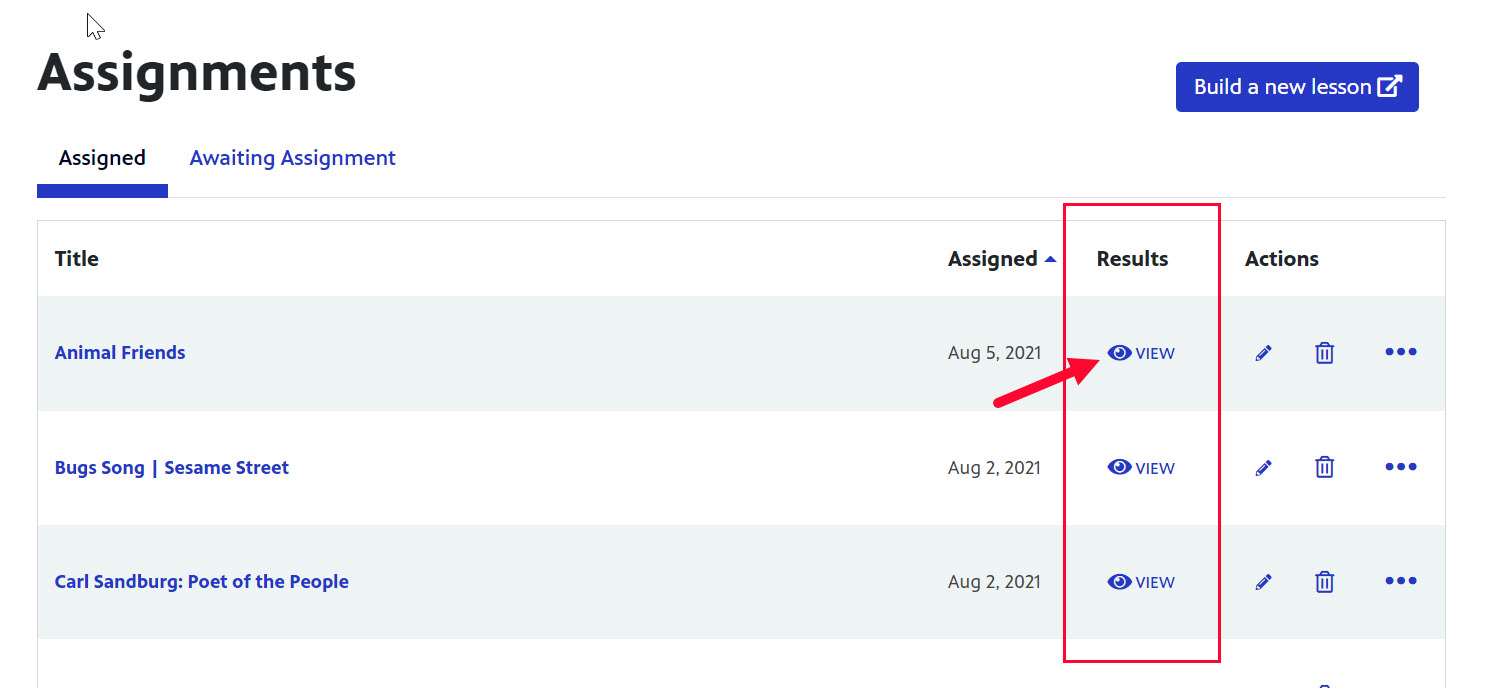
- From the Assignments page, in the Results column, click VIEW to the right of the name of the assignment for which you want to view results (Figure 1).
Figure 1
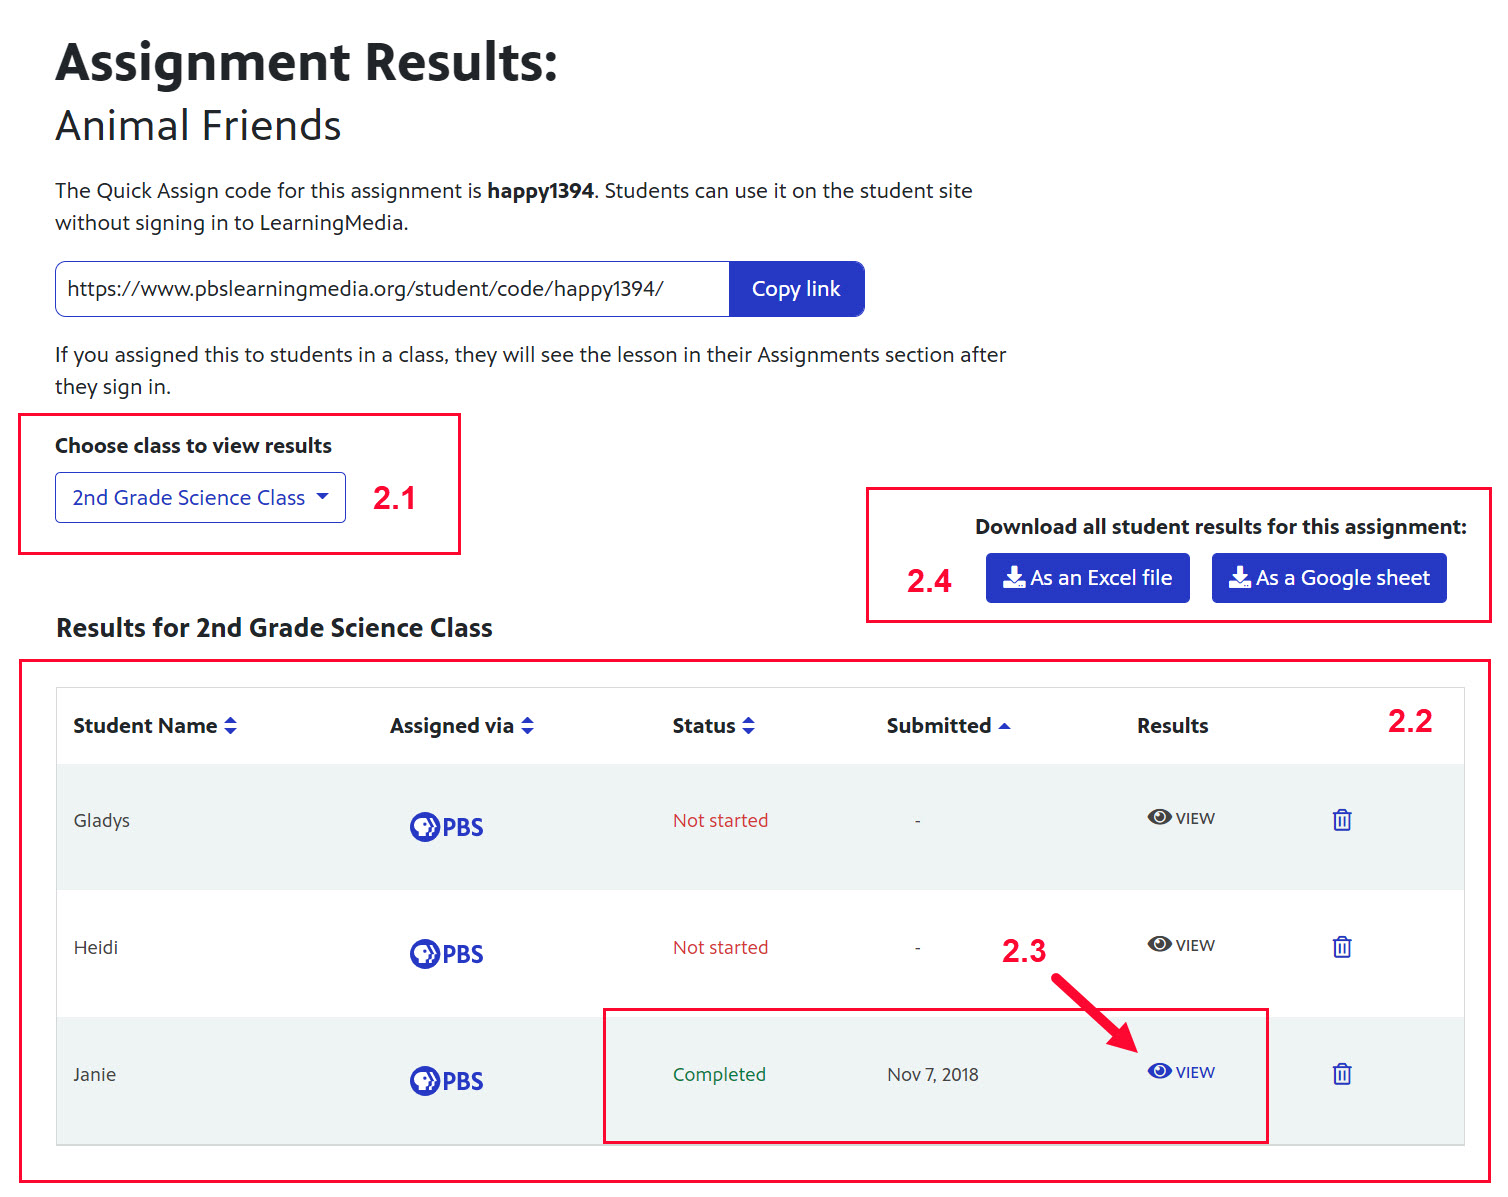
- The class for which you are viewing results displays (Figure2.1). To select a different class, click the dropdown menu and click the name of the class.
- All students who are included in the selected class are listed (Figure 2.2). Each student who has completed the assignment has a blue dot next to their name in the Status column and the date of completion in the Submitted column. This allows you to see which students still need to complete the assignment.
- Click the download button that reflects how you want to download the results (Figure 2.3).
- Excel file
- Google sheet
Figure 2
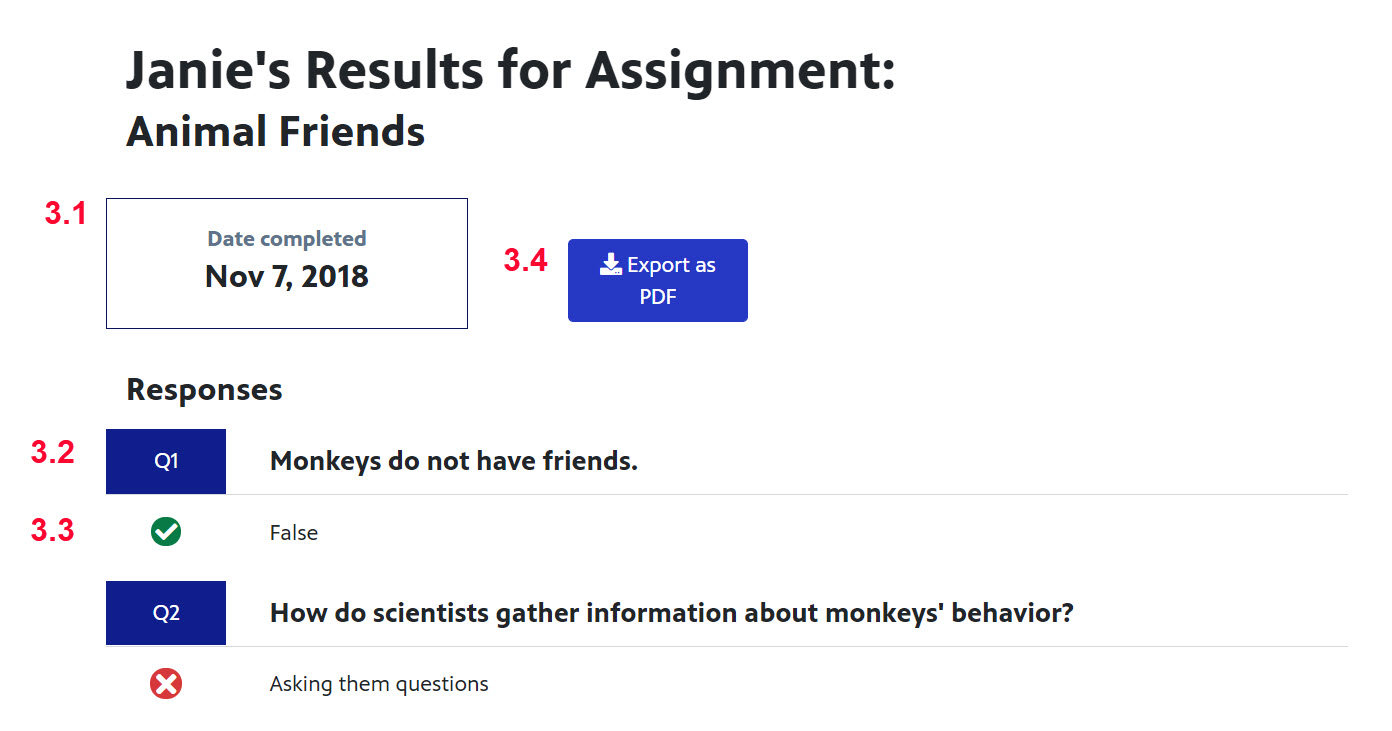
- The date the student submitted the assignment displays (Figure 3.1). The date does not display for students who have not yet submitted the assignment.
- The question number as it appears in the assignment displays on the left (Figure 3.2).
- If the student got the question correct, a green checkmark displays. If the student got the question wrong, a red x displays (Figure 3.3). Next to the checkmark/x the answer given by the student displays.
- Click Export to PDF to export the student's results (Figure 3.4).
Figure 3
View interactive lesson platform (ILP) results
Unlike typical student results, results for interactive lesson platform (ILP) resources contain score and results columns. Scores are presented as quantitative and there is an assessment at end of multple slides. The assessment slide results show in the Score column. Click the eyeball icon in the results to view student results in My Work folder on student site. Clicking results should take you back to the ILP to the My Work page, the aggregation of the student's work in the ILP.
Figure 1

How students should submit their ILP
View the following options for how to proceed after your students have completed an ILP:
| Teacher Action | Student Action After Completing ILP |
| Use Quick Assign and students are not logged in to PBS LearningMedia (i.e., student completed the interactive lesson as a guest) |
|
|
Use Quick Assign and students are logged in to PBS LearningMedia |
|
|
Interactive lesson is assigned to a class roster |
|
How to retrieve student login information
If a student in a teacher's class roster cannot remember their login credentials, the teacher is able to retrieve the account information for them. This feature is not available to a teacher whose students are not in their class rosters. Once a student joins a class roster, their teacher can access their account information. Once a student is removed from a class roster, a teacher can no longer access that student's account information.
When joining a class roster, a student is prompted to accept the terms associated with having their account information shared with their teacher. The PBS LearningMedia privacy policy outlines the rules associated with account information sharing.
This section shows how to retrieve student account information.
- From the left side navigation of your dashboard, click Classes (Figure 1.1).
- Click the name of the class to which the student belongs (Figure 1.2).
Figure 1

- To expand the actions menu, click the three dots to the right of name of the student whose account information you wish to access (Figure 2.1).
* The credentials for students who have signed up with their Google Classroom account cannot be accessed via PBS LearningMedia.
Figure 2

- When the menu displays, click Retrieve Login Info (Figure 3).
Figure 3

- The student's account information displays in a popup box and can be sent to the student by email, a written note, or verbally.
- When finished, click Close or click the X in the upper right corner to close the popup box (Figure 3).
Figure 3

How to unlock a student account
After several unsuccessful attempts to log in to their account, students are locked out of their account for approximately five minutes. If this happens, teachers can unlock the student's account and send them their login information.
This section shows how to unlock a student account.
- Open your class roster and on the right side of the name of the student whose account you want to unlock, click the three dots to open the actions menu (Figure 1).
Figure 1

- When the menu displays, click Unlock Account (Figure 2).
Figure 2

- After clicking Unlock Account, the account is unlocked and a confirmation displays in the upper right side of the screen (Figure 3). The student should now be able to log in successfully.
Figure 3

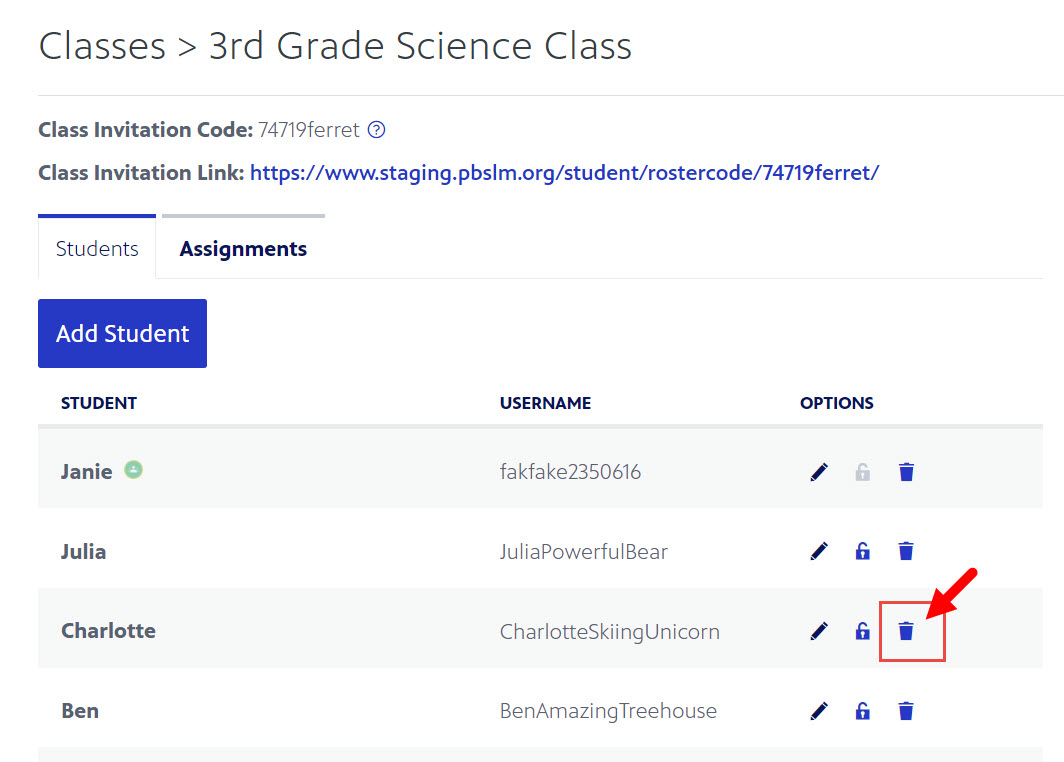
How to remove a student from your class roster
- - From the main Classes screen, click the class to which the student belongs (Figure 1).
Figure 1
- - Click the trashcan icon to the right of name of the student who you want to remove from the roster (Figure 2).
Figure 2
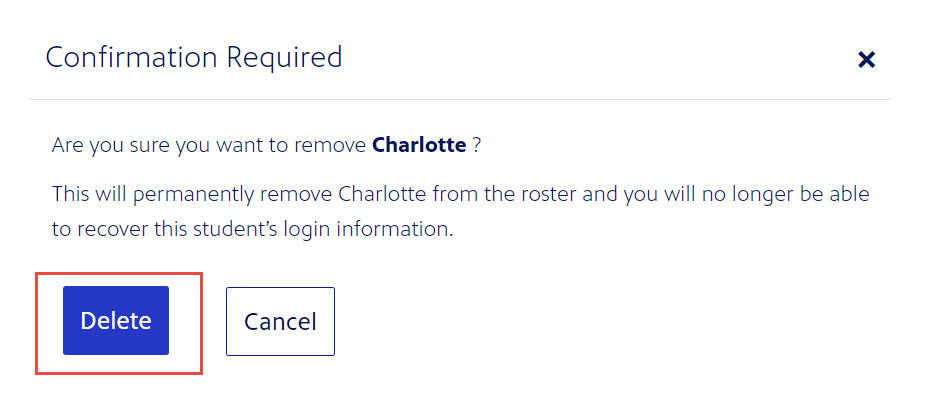
- - Click Delete to confirm the removal of the student (Figure 3).
Figure 3
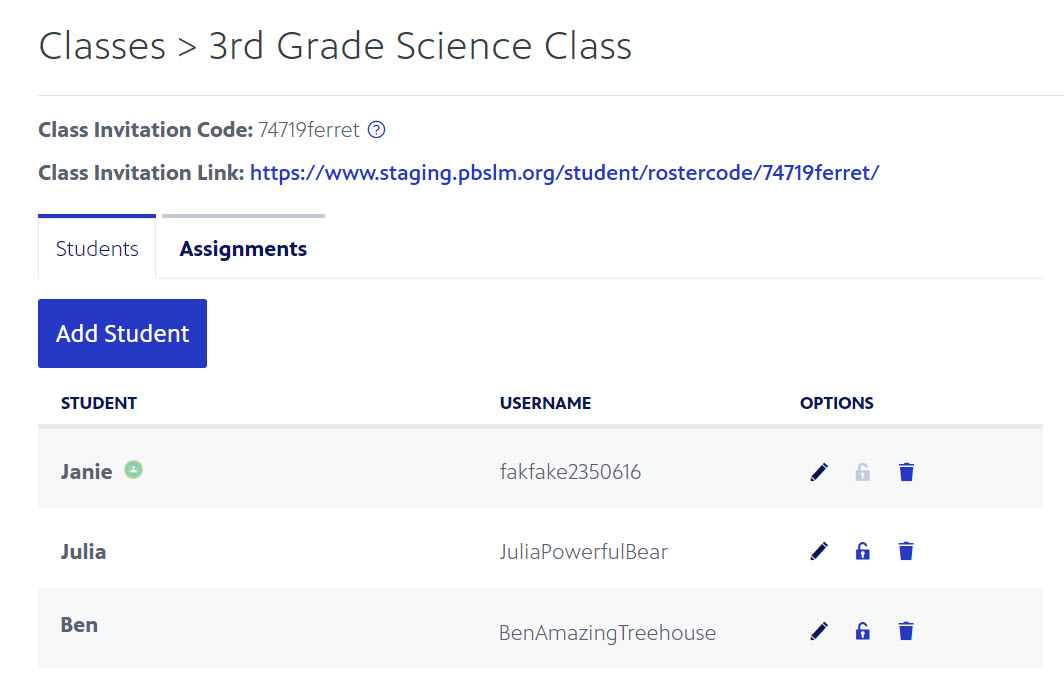
- - The student is no longer in your class roster (Figure 4). Learn how to add the student again
Figure 4
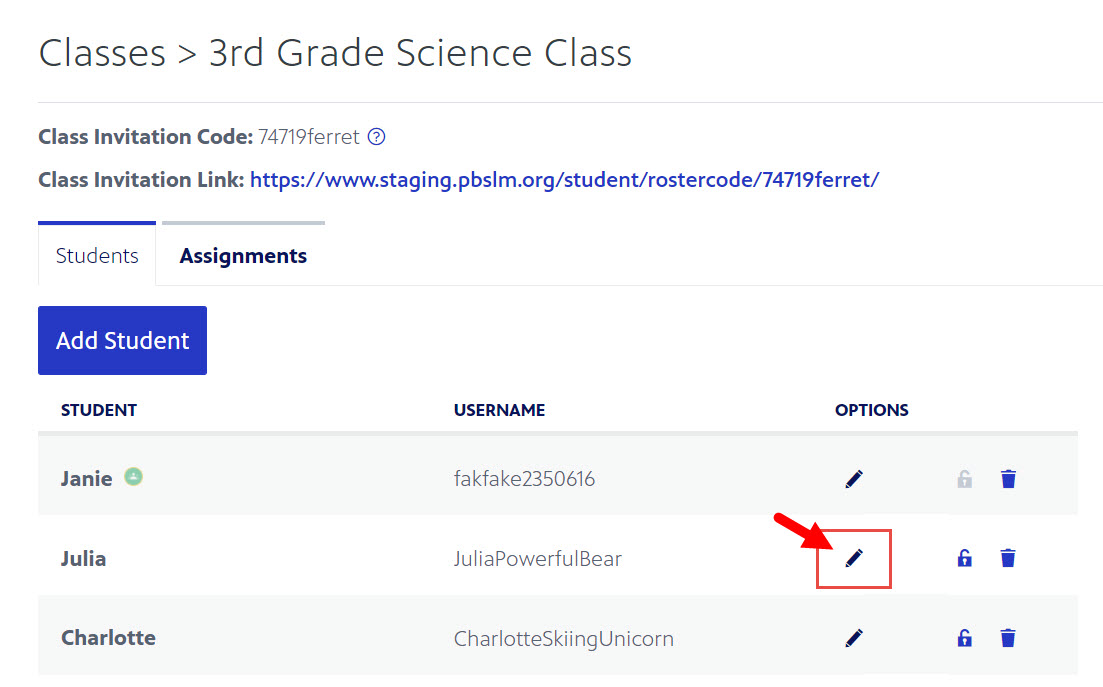
How to edit a student's display name
- - From the main Classes screen, click the class to which the student belongs (Figure 1).
Figure 1
- - Click the pencil icon (Figure 2).
Figure 2
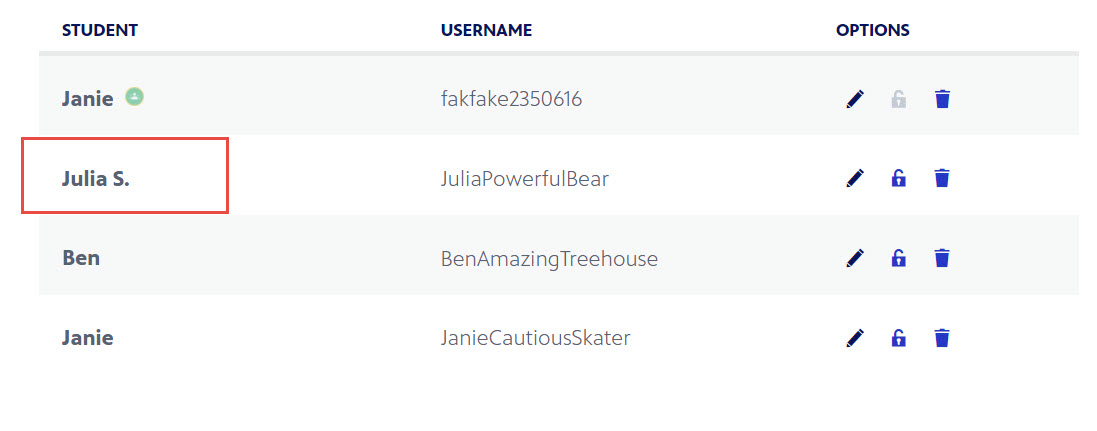
- In the textbox provided, type the changes to the student's name.
- Click the checkmark to save your changes (Figure 3.1).
- Click the X to cancel your changes (Figure 3.2).
Figure 3

- The name displays the change in the class roster (Figure 4).
Figure 4
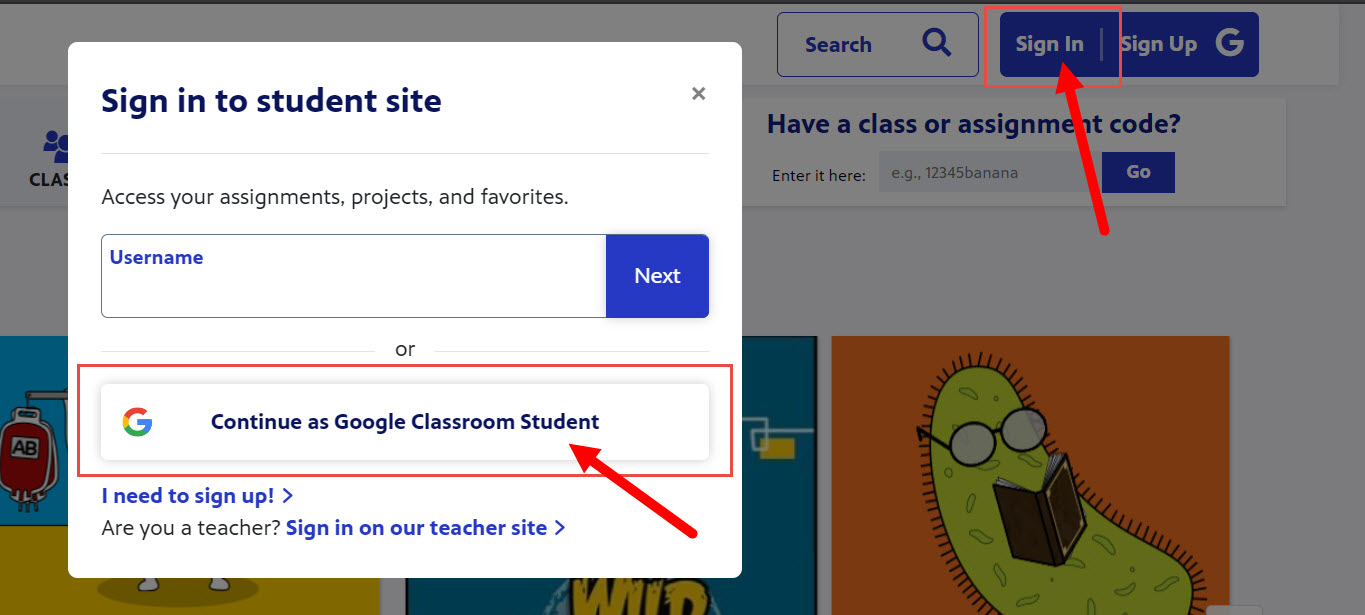
How imported students can create a PBS LearningMedia account
Each student that has been imported into PBS LearningMedia must have a PBS LearningMedia account to receive assignments. This section shows how your students can create an account using their Google credentials.
Click here to learn more about using Google Classroom in PBS LearningMedia
- Students should go the PBS LearningMedia student site, click Sign In and click Continue as Google Classroom Student (Figure 1).
Figure 1
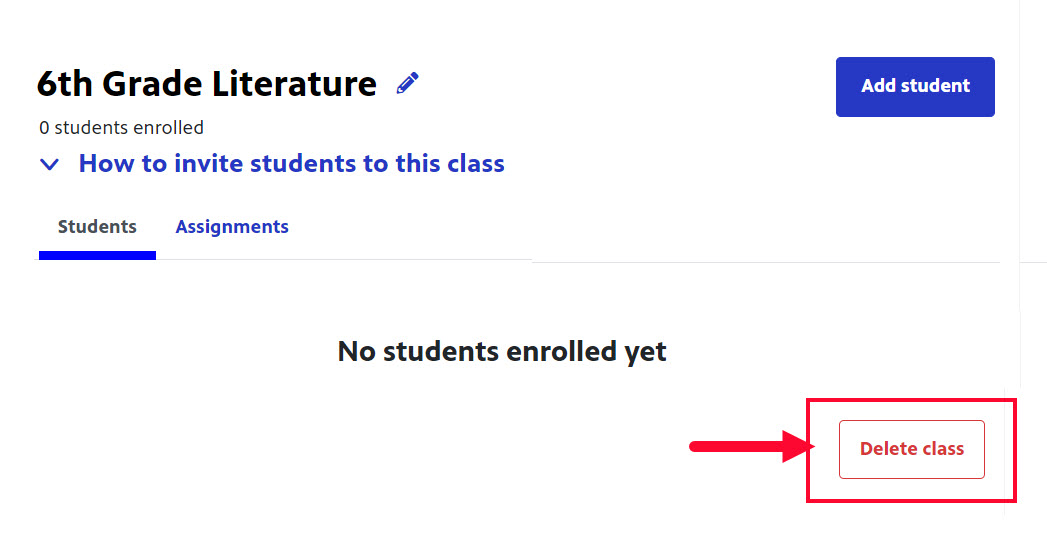
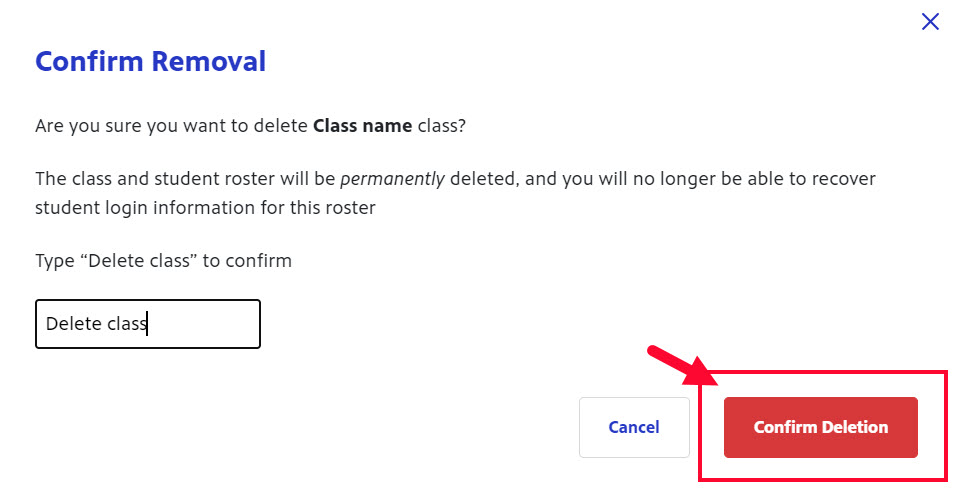
How to delete a class
To keep your class rosters orderly, remove any classes that have changed, been created by mistake, or have been discontinued. This section shows you how to delete a class.
- Open the class you want to delete and in the lower right corner of the page, click Delete class (Figure 1).
Figure 1
- A confirmation model displays. In the textbox type Delete class (Figure 2).
- You do not need to include quotation marks.
- The Confirm Deletion box in the lower right side of the page is inactive until Delete class is typed in the textbox.
Figure 2

- After typing Delete class, the Confirm Deletion turns red and is active. Click Confirm Deletion (Figure 3).
Figure 3
The class is removed from your class list and cannot be recovered. If the deletion was made in error, you must recreate the class again.