Account Registration and Management
|
In this section: |
 Need help? Click here Need help? Click here |
- How to create a teacher account
- How to view and edit your profile
- Student Privacy
- How to select a station
- Forgot your password?
- Create student accounts
PBS LearningMedia is intended for use by both teachers and students. Creating a teacher account is different from creating a student account. This section demonstrates how to create a teacher user account. Students can click here to learn how to set up an account.
How to create a teacher account
Creating a PBS LearningMedia teacher account opens up full access to our digital media service where you can browse content, favorite resources, and surface assets from your local station's service.
This section demonstrates how to create a teacher account.
- From http://www.pbslearningmedia.org, click Sign up for free! in the upper right side of the screen (Figure 1).
- If you already have an account, click Sign In.
Figure 1

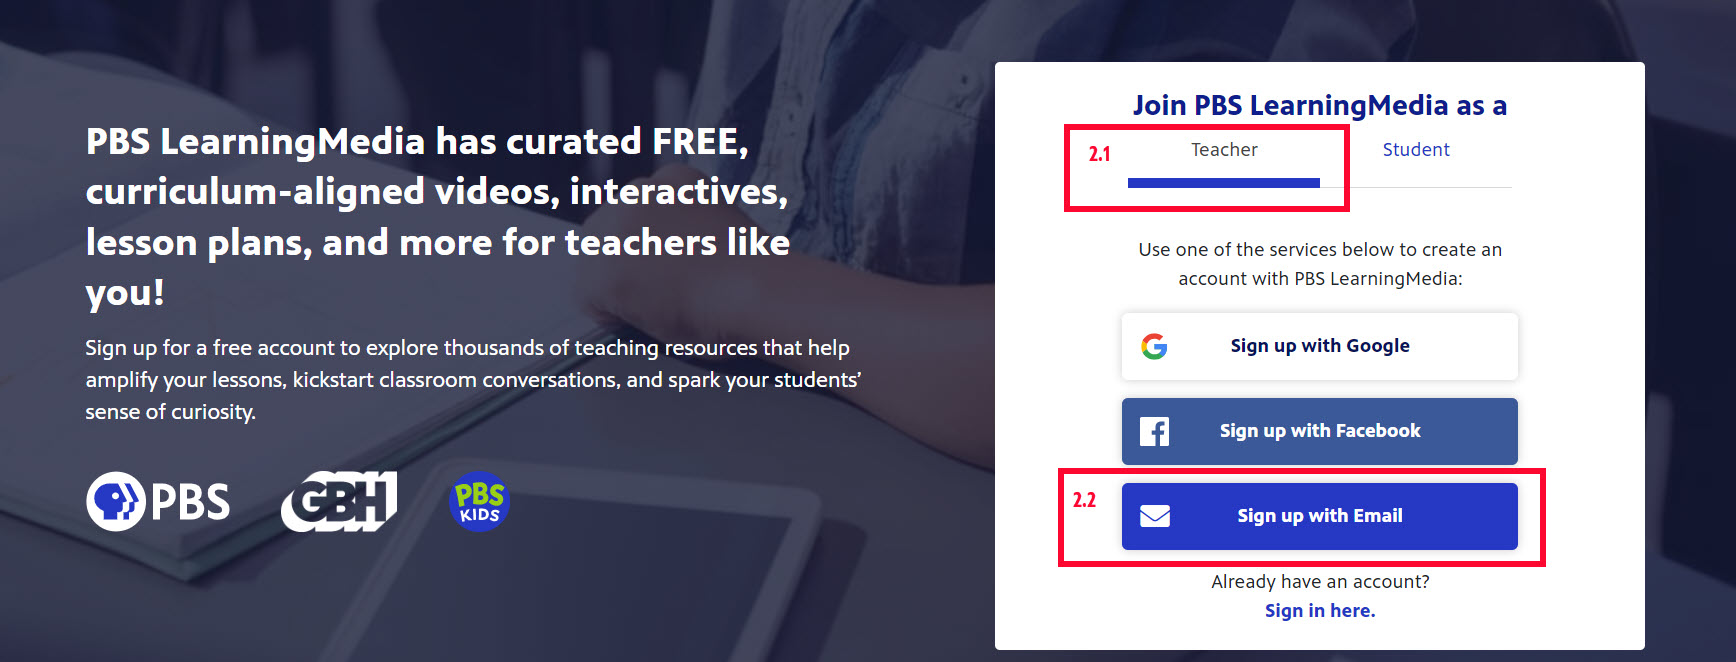
- Be sure Teacher is underlined, indicating that it is selected (Figure 2.1).
- The selection you make here determines how you will sign in each time you come to the PBS LearningMedia site. Click Email (Figure 2.2).
- To use Google or Facebook, you must have an existing account with those services. Create your account using one of the following:
- To use Google or Facebook, you must have an existing account with those services. Create your account using one of the following:
Figure 2
- Type your first and last name in the textboxes provided (Figure 3.1).
- Type your email address in the textbox provided (Figure 3.2).
- In the New Password textbox, type the password that you want to associate with this account (Figure 3.3). Your password must at least eight (8) characters, and include both letters and numbers.
- Click Show Password to display your password as you type (Figure 3.4).
- Click the checkbox next to I accept the Terms of Use and Privacy Policy (Figure 3.5). If you do not check this box, you cannot continue with the account creation process.
- Click Create an Account (Figure 3.6).
Figure 3

- After clicking Create an Account, a verification code is automatically sent to the email address you entered when you created your account (Figure 4). Learn more about verification codes
Figure 4

- Go to the associated email account and open the email from no-reply@pbs.org (Figure 5.1).
- If you have not received the email, check your Spam folder. If it still cannot be found, click Resend Code, located to the right of the code textbox, as shown in Figure 6.1.
- Copy the six-digit code that displays (Figure 5.2).
Figure 5

- Return to the PBS LearningMedia sign-on screen and paste the six-digit code in the textbox provided (Figure 6.1).
- If you have not received the email, check your Spam folder. If it still cannot be found, click Resend Code, located to the right of the Verification Code textbox.
- Click Continue (Figure 6.2).
Figure 6

- If the code has been accepted, your account is verified and you are redirected to a confirmation screen indicating that your login is successful (Figure 7). After a few seconds you are automatically redirected to the PBS LearningMedia homepage.
Figure 7

After you've successfully logged in, you are directed to your profile page. The station to which you are localized displays in the upper left corner of the page (Figure 8.1) and your login name displays in the upper right side (Figure 8.2).
Figure 8

How to view and edit your profile
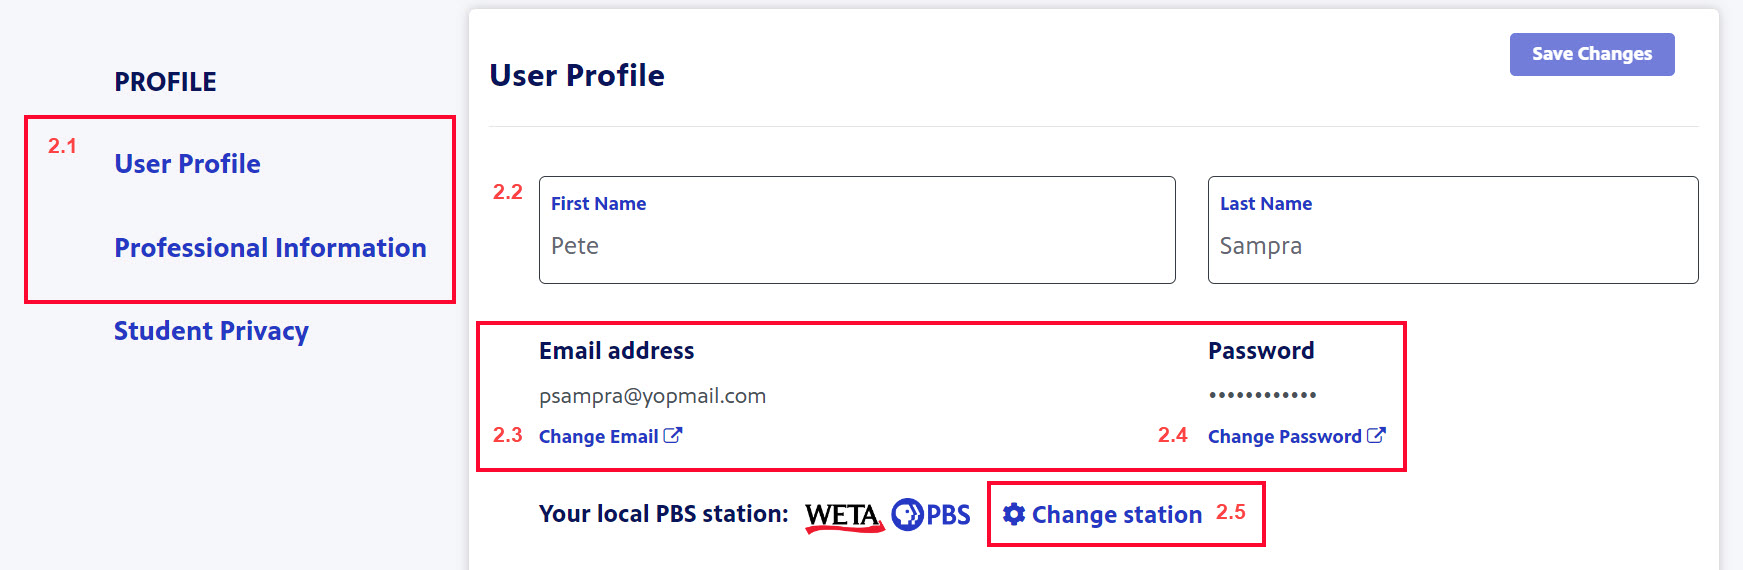
The profile page is where you can edit your personal and professional information as it relates to PBS LearningMedia. Access your profile at any time by clicking your name in the upper right corner and clicking Profile in the dropdown menu (Figure 1).
Figure 1

User Information
- Links to each section of your profile display on the left side of the page (Figure 2.1). Click each link to drop to the corresponding section.
- Type right inside the First Name and Last Name textboxes to modify your first or last name (Figure 2.2).
- If you created your account using an email address, the address displays. Click Change Email to modify or replace the email associated with your account (Figure 2.3).
- To change your password, click Change Password (Figure 2.4).
- Click Change station to localize to another station (Figure 2.5). This will display "Not localized" if you have not yet selected a station.
* Log out of the site and log back in to activate the changes to your email address and password.
Figure 2
Professional Information
- In the Professional Information section, click Change station if you want to change the state educational standards with which your profile is associated (Figure 3.1).
- Click the Choose Role dropdown menu to select your role in your organization (Figure 3.2).
Figure 3

- Your selected role displays (Figure 4.1).
- Click the checkbox next to each Grade that you teach (Figure 4.2). Select all that apply.
- Click the checkbox next to each Subject that is applicable to the subject areas you teach (Figure 4.3). Select all that apply.
- When finished, click Save Changes (Figure 4.4).
Figure 4

Student Privacy
In order to support our continued compliance with public school districts’ data privacy policies, we ask that teachers provide their public school district and acknowledge the PBS LearningMedia privacy agreement when they use tools that require student PII (personally identifiable information). Teachers can provide this information on the profile page in the Student Privacy section before using tools such as Lesson Builder, Class Rosters, and Quick Assign.
If you are a teacher who is not able to provide public school district information, you can still easily use and share PBS LearningMedia resources without sharing student data by providing links to students or projecting onto a shared screen. If you are uncertain whether or not you can provide this information, please consult your school administrator. For more information about our student data privacy policies, visit the Student Privacy Notice.
This section walks you through the student privacy section of your profile.
- In the Classroom Setting section, click the radio button (Figure 1) next to the option that best describes the educational setting in which you teach:
- Public school
- Private school
- Homeschool/Tutor
* In the following example, we are selecting a public school setting.
Figure 1

In this example we are demonstrating the flow a public school teacher would experience.
- Once you've clicked the radio button next to the public school selection, a dropdown menu displays. Click Select state to surface the state options (Figure 2).
Figure 2

- In the textbox, begin typing the name of the state in which you are teaching (Figure 3.1).
- When the list of matches displays, click the name of the state that applies (Figure 3.2).
Figure 3

- A School district option displays. In the textbox, begin typing the name of the school district in which you are teaching and when the list of matches displays, click the name of the school district that applies (Figure 4).
* If you work at a charter school, type in your charter school name. If your school is not found, see Figure 5.
Figure 4

- If your school district does not display, click Can't find your school district? and fill out the form provided (Figure 5.1).
- In the School textbox, begin typing the name of the school where you teach (Figure 5.2).
- When the list of matches displays, click the name of the school that applies (Figure 5.3).
* This field is optional.
Figure 5

- When finished, click the checkbox in the Privacy Policy Acknowledgment section (Figure 6.1).
- Click Submit (Figure 6.2).
Figure 6

- A confirmation message displays, indicating your Student Privacy information has been successfully submitted (Figure 7).
Figure 7

- After you confirm your school district information, the Student Privacy section displays the school district and school name that you submitted (Figure 8.1).
- If you need to make changes to any information you submitted, click Need to make a change? Let us know. and fill out the form provided (Figure 8.2).
Figure 8

How to select a station
You can localize to any participating local station within the United States. You also have the option to view the national PBS LearningMedia site which is not tied to any local station.
Selecting a local station gives you access to that station's local content, such as upcoming events, social media posts, blogs, and other information that may be of interest to you.
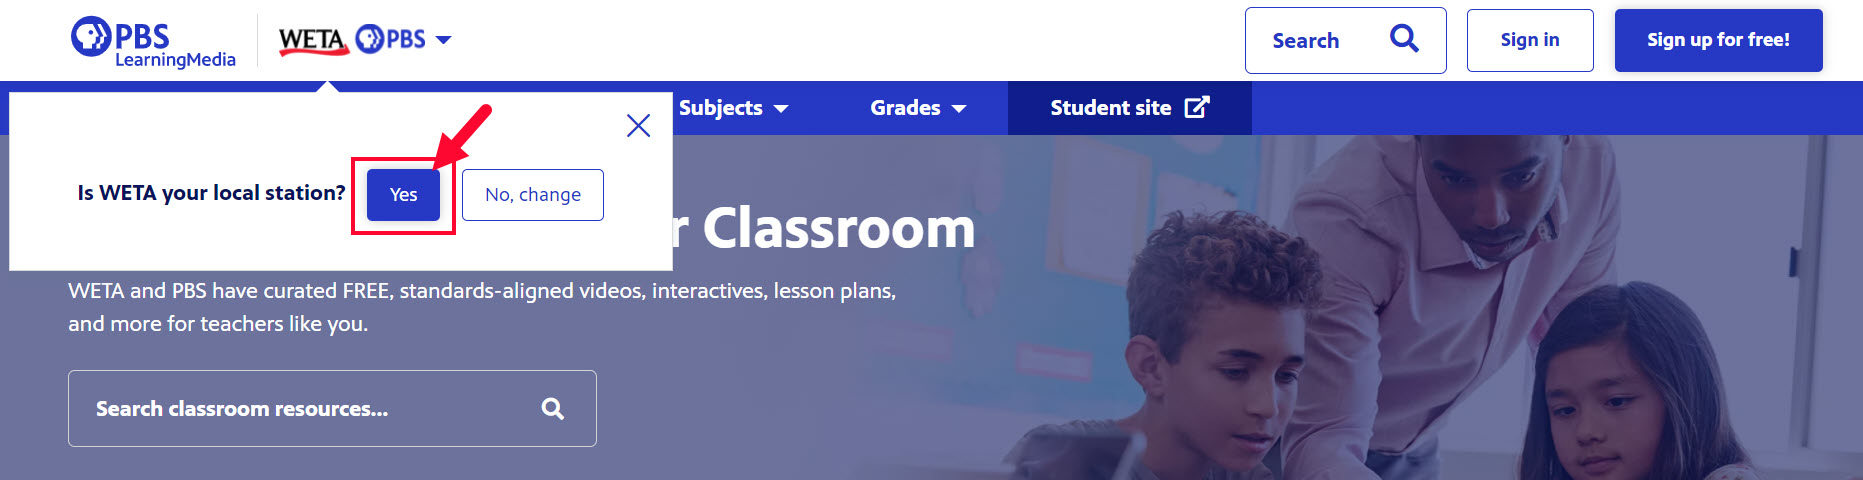
Note: If you don't want to localize to a station and want to use the national site, click No.
Keeping the station that is automatically assigned
- Go to www.pbslearningmedia.org.
- If coming to the site for the first time, your local station is automatically selected according to your IP address. You will see an option to confirm the station that was selected or change your local station. Click Yes to keep the station that was selected (Figure 1).
Figure 1
How to select a different station
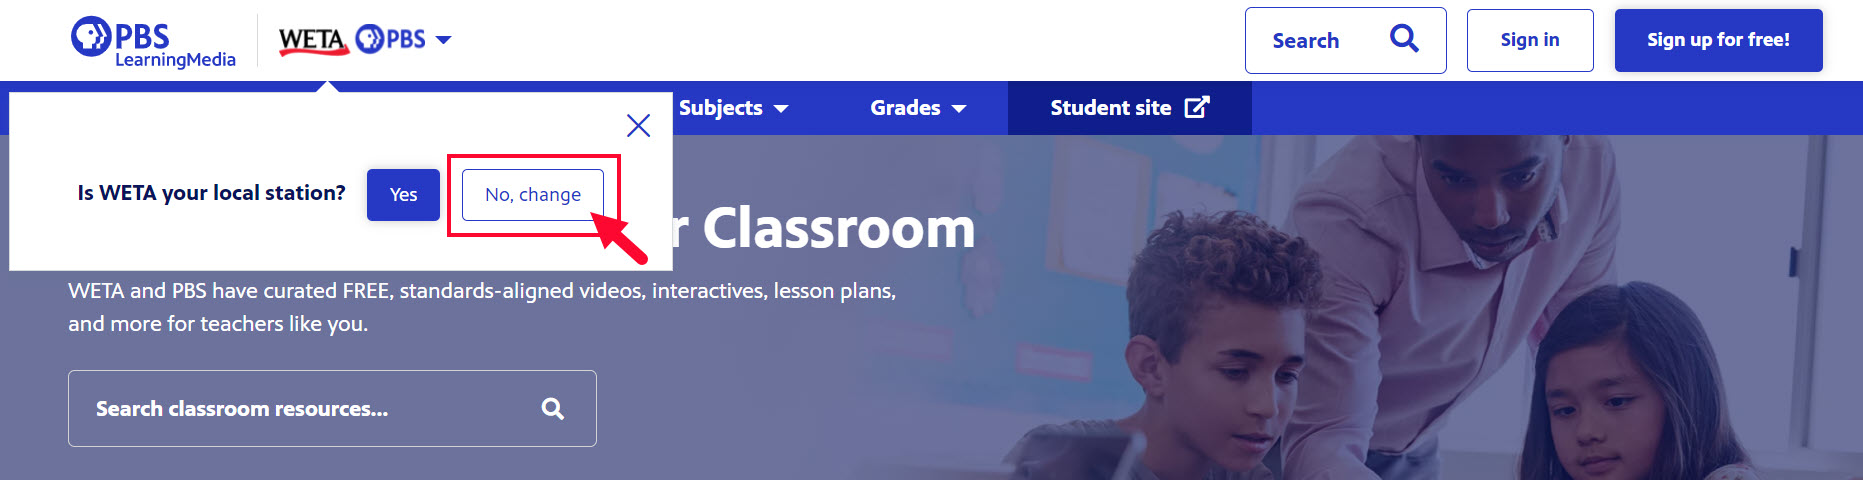
- When the prompt appears asking you to confirm the current station or select a different station, click No, change (Figure 1).
Figure 1
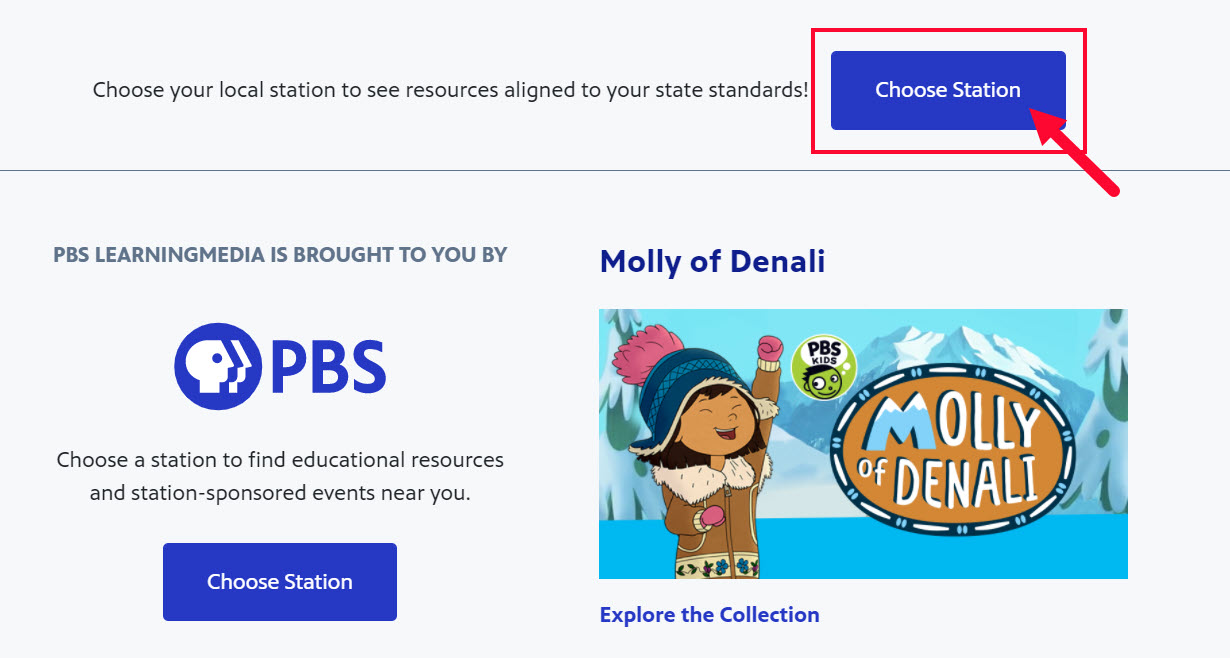
- Click Choose Station (Figure 2).
Figure 2
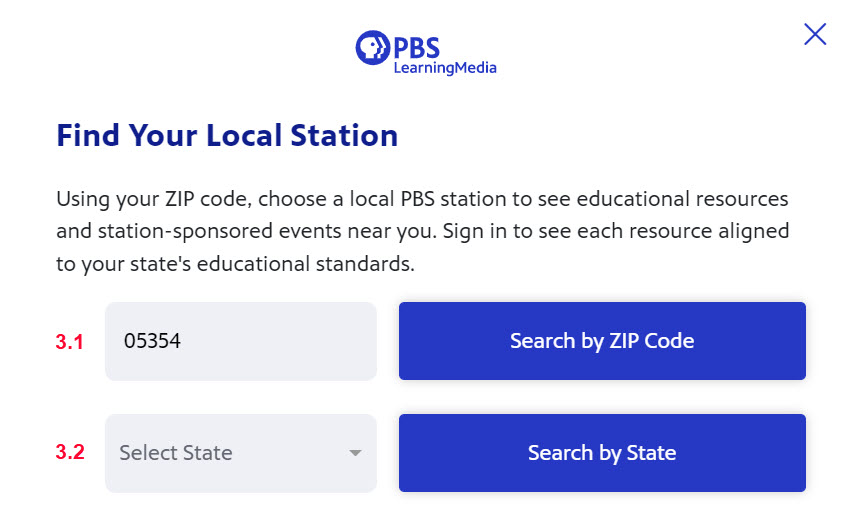
You have two options to search for a new station:
- Search by Zip Code: In the textbox provided, type the five-digit zip code that is associated with your school and click Search by ZIP Code (Figure 3.1).
- Search by State: Click the Select State dropdown menu and click the name of the state that is associated with your school (Figure 3.2).
Figure 3
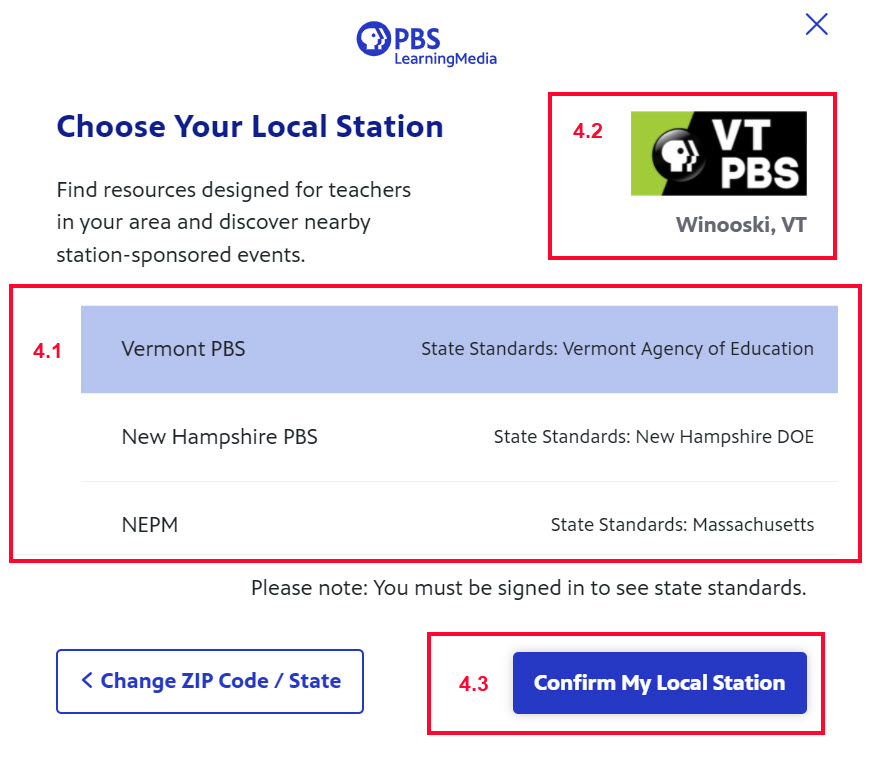
- If more than one station is returned in the zipcode search results, click the name of the station you want to select (Figure 4.1).
- The logo of the station you selected previews, indicating that you are now localized to that station and will see that station's local content (Figure 4.2).
- To select the station, click Confirm My Local Station (Figure 4.3).
Figure 4
Forgot your password?
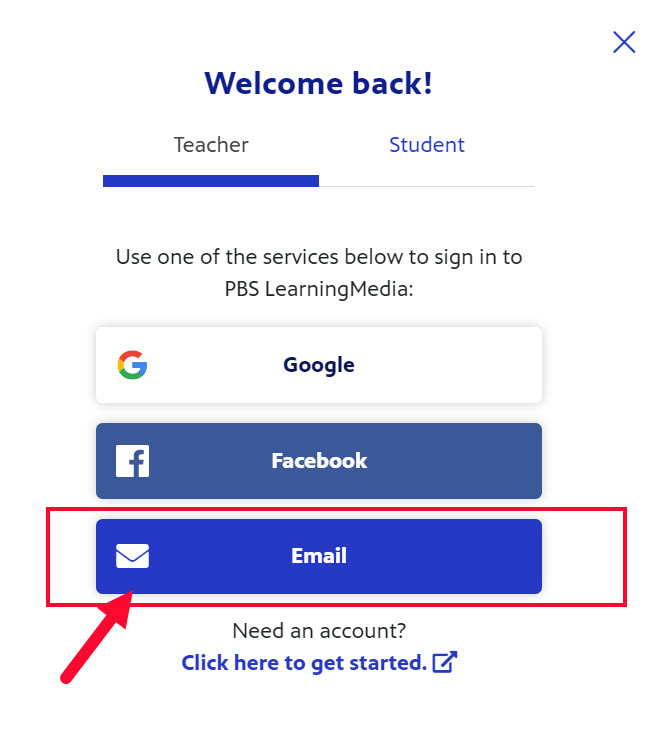
- After clicking Sign In from the PBS LearningMedia homepage, click Email (Figure 1).
Figure 1
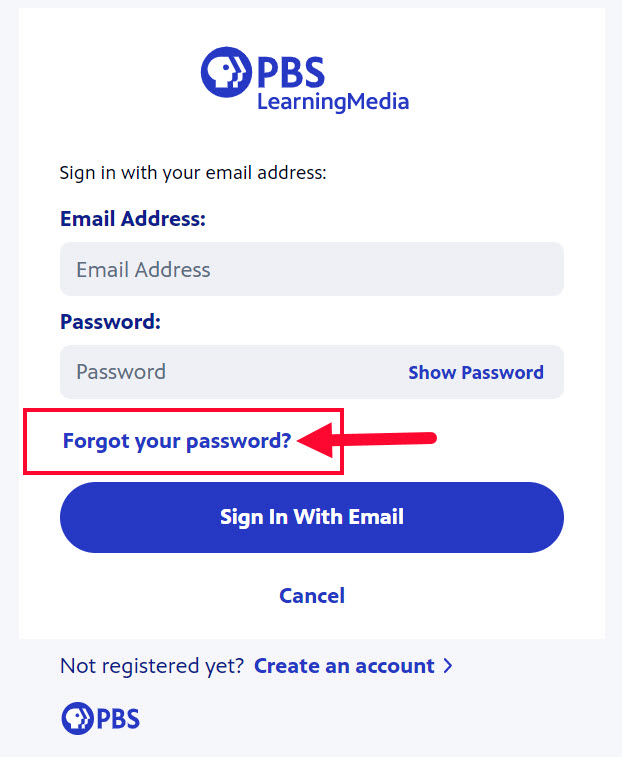
- Click Forgot your password? (Figure 2).
Figure 2
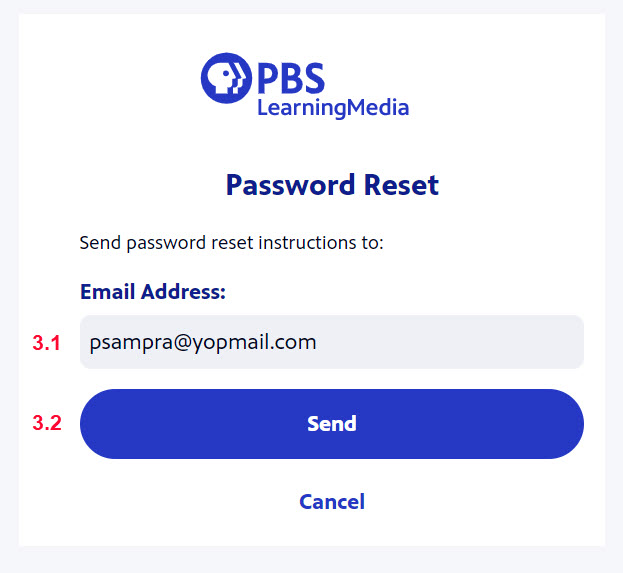
- In the Email textbox, type the email address that is associated with your PBS LearningMedia account (Figure 2.1).
- Click Send (Figure 3.2).
- Click Cancel if you suddenly remembered your password (yay!) and no longer need to submit the form.
Figure 3
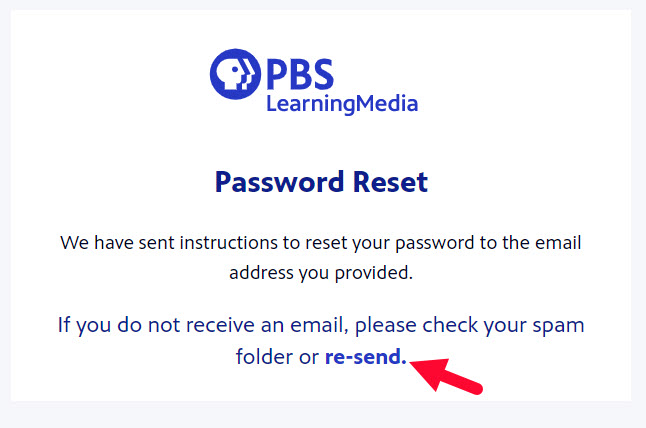
- A message confirming that your password has been sent to the email address appears. (Figure 4).
* If you do not see the email in your Inbox, check your spam or junk folder or click re-send on this page.
Figure 4
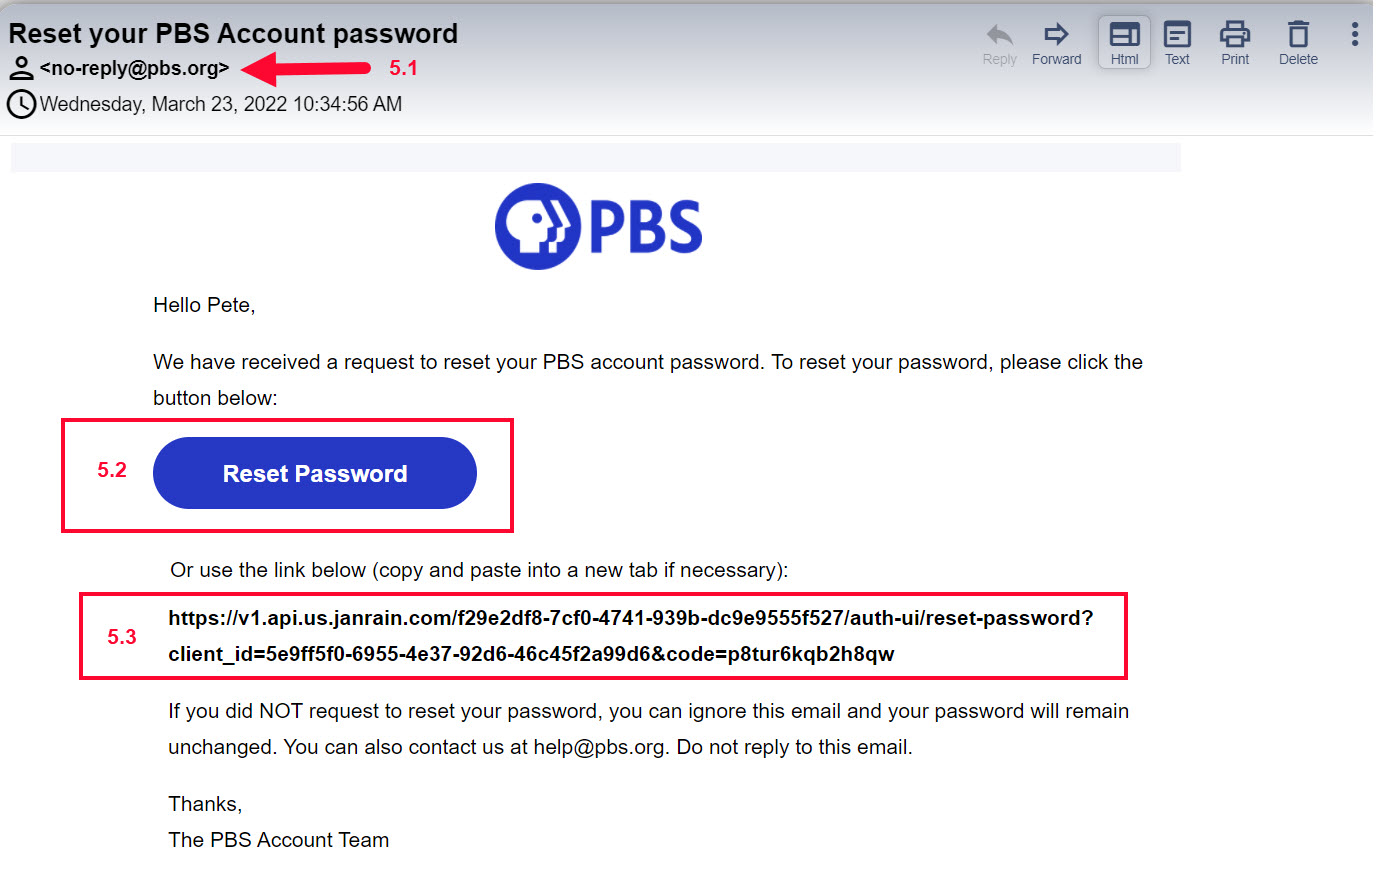
- Open your email inbox and click the link provided in the body of the email sent from no-reply@pbs.org (Figure 5.1).
- Click Reset Password (Figure 5.2).
- Alternatively, you may also click the reset link provided in the body of the email (Figure 5.3).
Figure 5
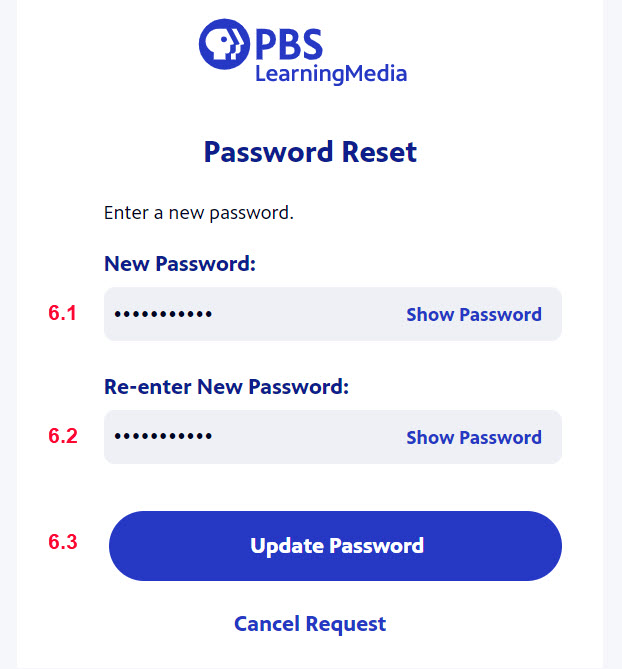
- In the New password textbox, type a new password that contains between 8-90 characters (Figure 6.1). Include numbers and capital letters to increase the security of your password.
- In the Re-enter New Password confirmation textbox, type the same password again (Figure 6.2).
- Click Update Password (Figure 6.3).
- Click Cancel Request if you no longer need to reset your password.
Figure 6
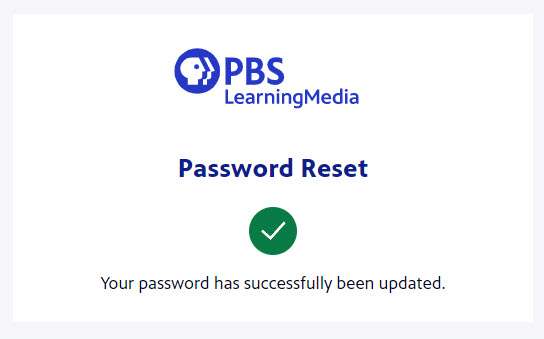
- A password reset screen displays briefly, letting you know your new password is the password on record and should be used each time you log in to the PBS LearningMedia website (Figure 7).
Figure 7
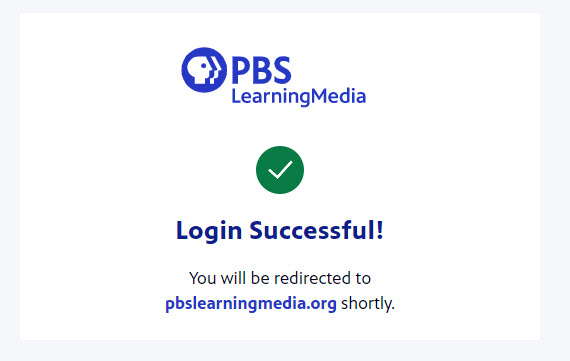
- A login successful screen displays briefly to let you know you're good to go and are being logged in to the PBS LearningMedia site with your new password (Figure 8).
Figure 8
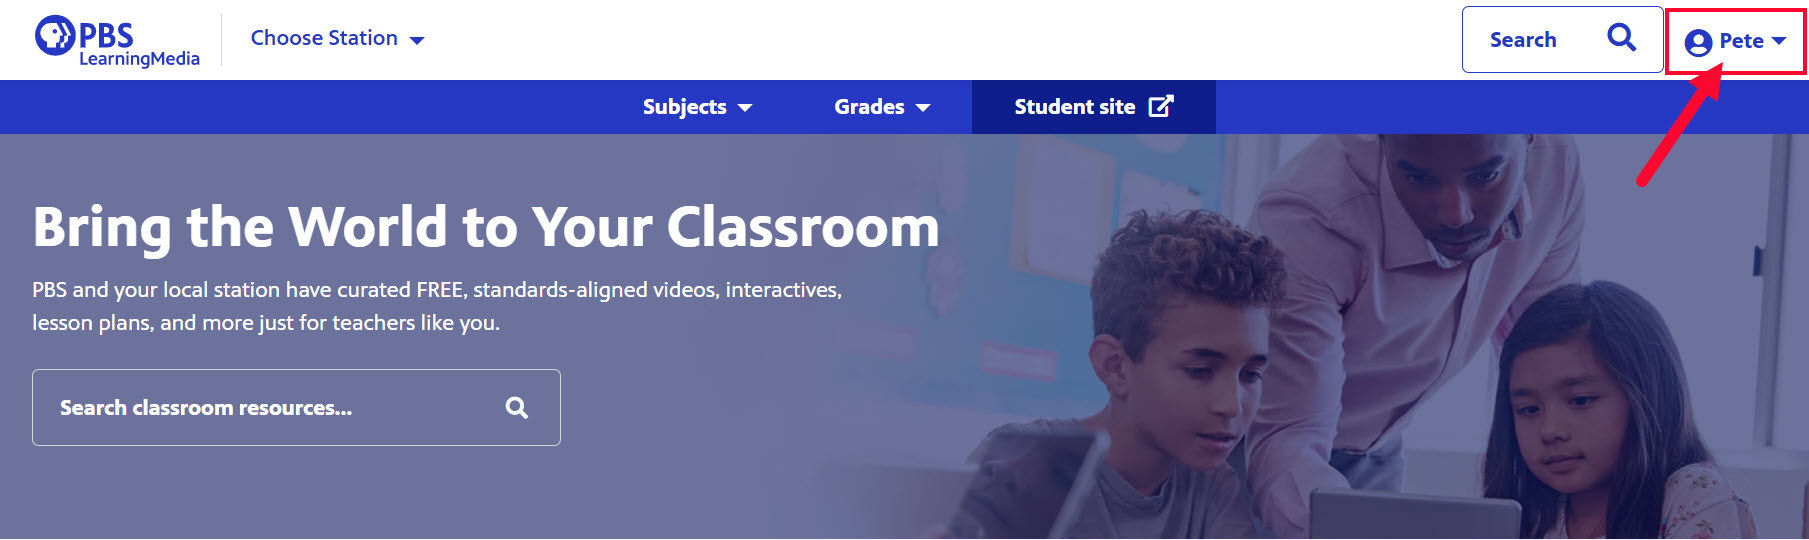
- You are redirected to the PBS LearningMedia homepage and are logged in with your login name displayed in the upper right corner of the page (Figure 9).
Figure 9
Creating student accounts
As a teacher, you do not need to create accounts for your students. It's easy and safe for students to create their own accounts with our simple student registration process.
To create a student account, students should go to http://www.pbslearningmedia.org/student/signup and follow the steps listed. For step by step instructions, go to the student help page.
Need help? Click here